InspectCapture Mobile
1. Why this app
The problem the system solves
When an inspector arrives at a water, fire, or mold loss they need to accomplish in a single visit:
- Document the condition of every room with photos and moisture readings
- Record the scope of work
- Calculate and install equipment
- Upload everything to the system for the carrier and the office
The traditional approach — notebook, camera app, manual data entry back at the office — results in:
- Lost data and transcription errors
- Billing delays (no SOW = no payment)
- Disputes with adjusters over missing documentation
- Re-visits to photograph what was already photographed
What InspectCapture delivers
| Task | Without app | With app |
|---|---|---|
| Damage documentation | Photos in Camera Roll, handwritten notes | Photos automatically linked to room, phase, and inspection |
| Scope of work | Voice memo → manual typing in office | Voice dictation → AI transcription → structured line items |
| Equipment calculation | Formula in your head | Auto-calculated from room area |
| Moisture readings | Written on paper | OCR from meter display, daily trend history |
| 3D floor plan | Tape measure + sketch | LiDAR scan in 2 minutes |
| Insurance documentation | Manual PDF folder | Auto-generated SOW + S500 compliance packet |
| Offline operation | — | Full functionality offline, syncs when connection returns |
2. Roles in the system
| Role | Who | What they do in the app |
|---|---|---|
| Inspector | Field technician | Runs Initial and Monitoring inspections, installs equipment |
| Crew | Demo crew | Documents demolition progress via Demo inspection and 360° camera |
| Operator | Office | Reviews scope, approves AI suggestions, generates SOW |
This manual is written primarily for the Inspector.
3. Workflow overview
Every project follows the same sequence from first call to closed claim:
INSURANCE LOSS
  ↓
Create project — address, loss type, contacts
  ↓
INITIAL INSPECTION (first visit)
  1. Arrive → photo of exterior / address placard
  2. Set up rooms: floors and spaces
  3. Before photos of all rooms
  4. Moisture readings per room and material
  5. LiDAR room scan → floor area → equipment formula
  6. Scope video → AI extracts line items
  7. Equipment install → QR scan each unit
  8. Homeowner signature

MONITORING VISITS (daily)
  ↓ moisture readings
  ↓ equipment check (QR scan)
  ↓ finalize day → sync

DEMO / DRYING COMPLETE
  ↓ 360° panorama before demo
  ↓ timelapse during work
  ↓ checkpoint photos: containment → drywall cut → framing exposed
  ↓ equipment removed (QR scan)
  ↓ after photos

  → OFFICE: browser link → 3D model, moisture chart, scope, compliance, estimate PDF
  → CARRIER: tamper-evident documentation package
4. Login & security
Login screen
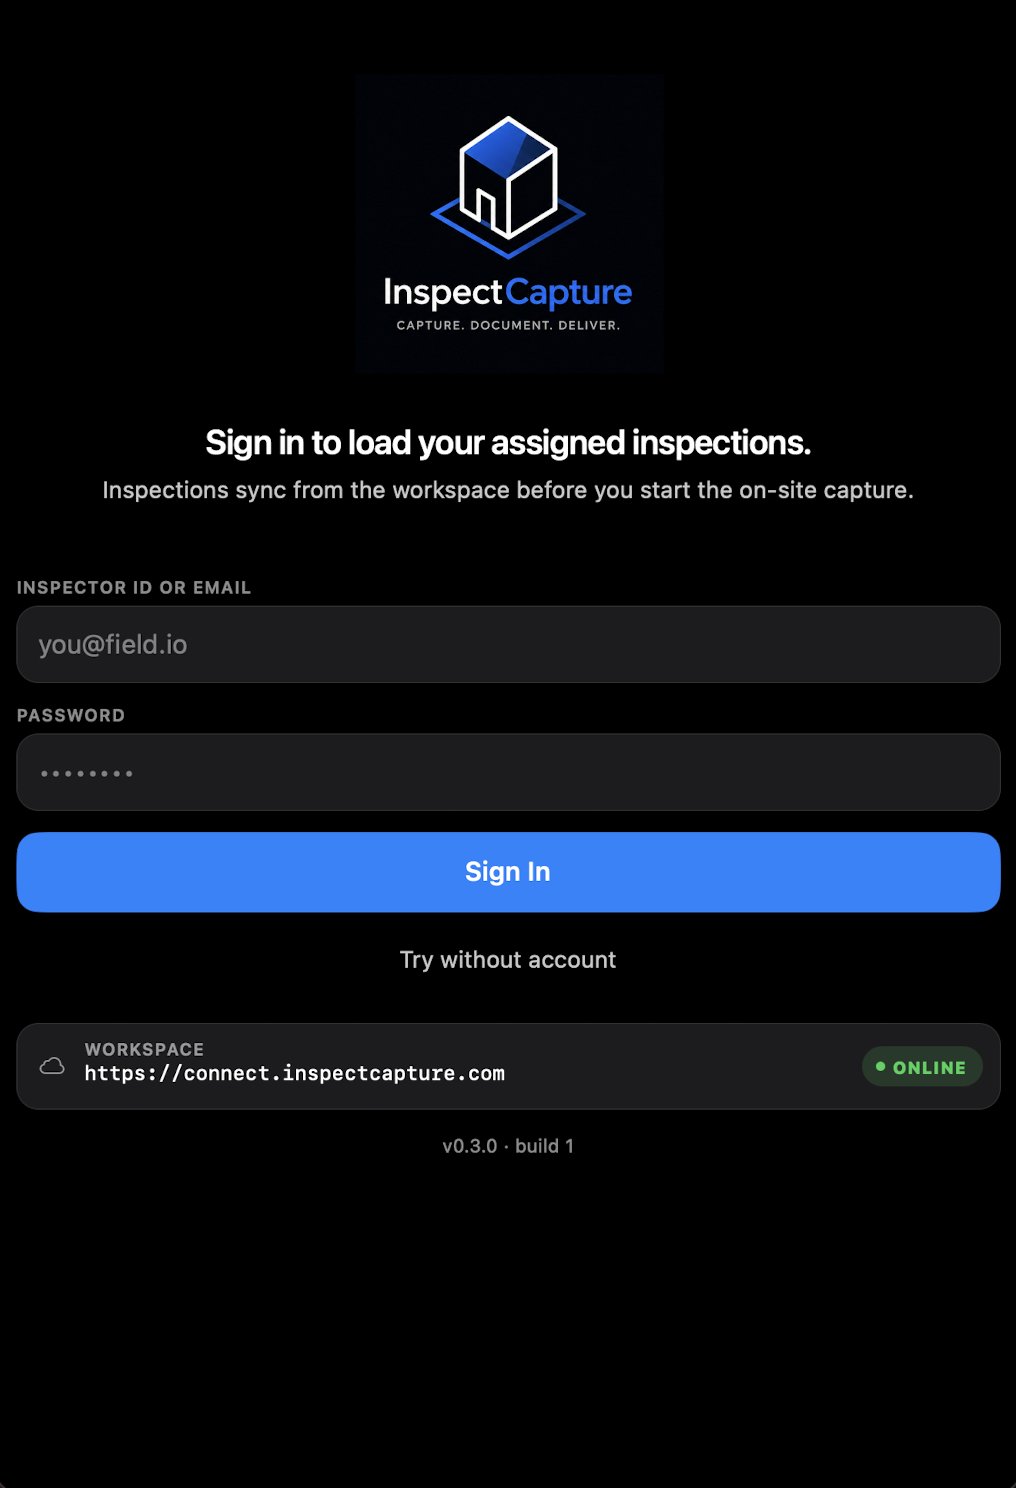
On first launch the app shows the login screen. Enter your company email and the password provided by your administrator.
What happens on login:
- The app downloads your configuration: work catalog, equipment formulas, workflow templates
- All configuration is cached locally — the next launch doesn't require internet
Biometric lock
After login you can protect the app with Face ID / Touch ID. Returning from background triggers a quick biometric unlock — no password re-entry required.
5. Projects list
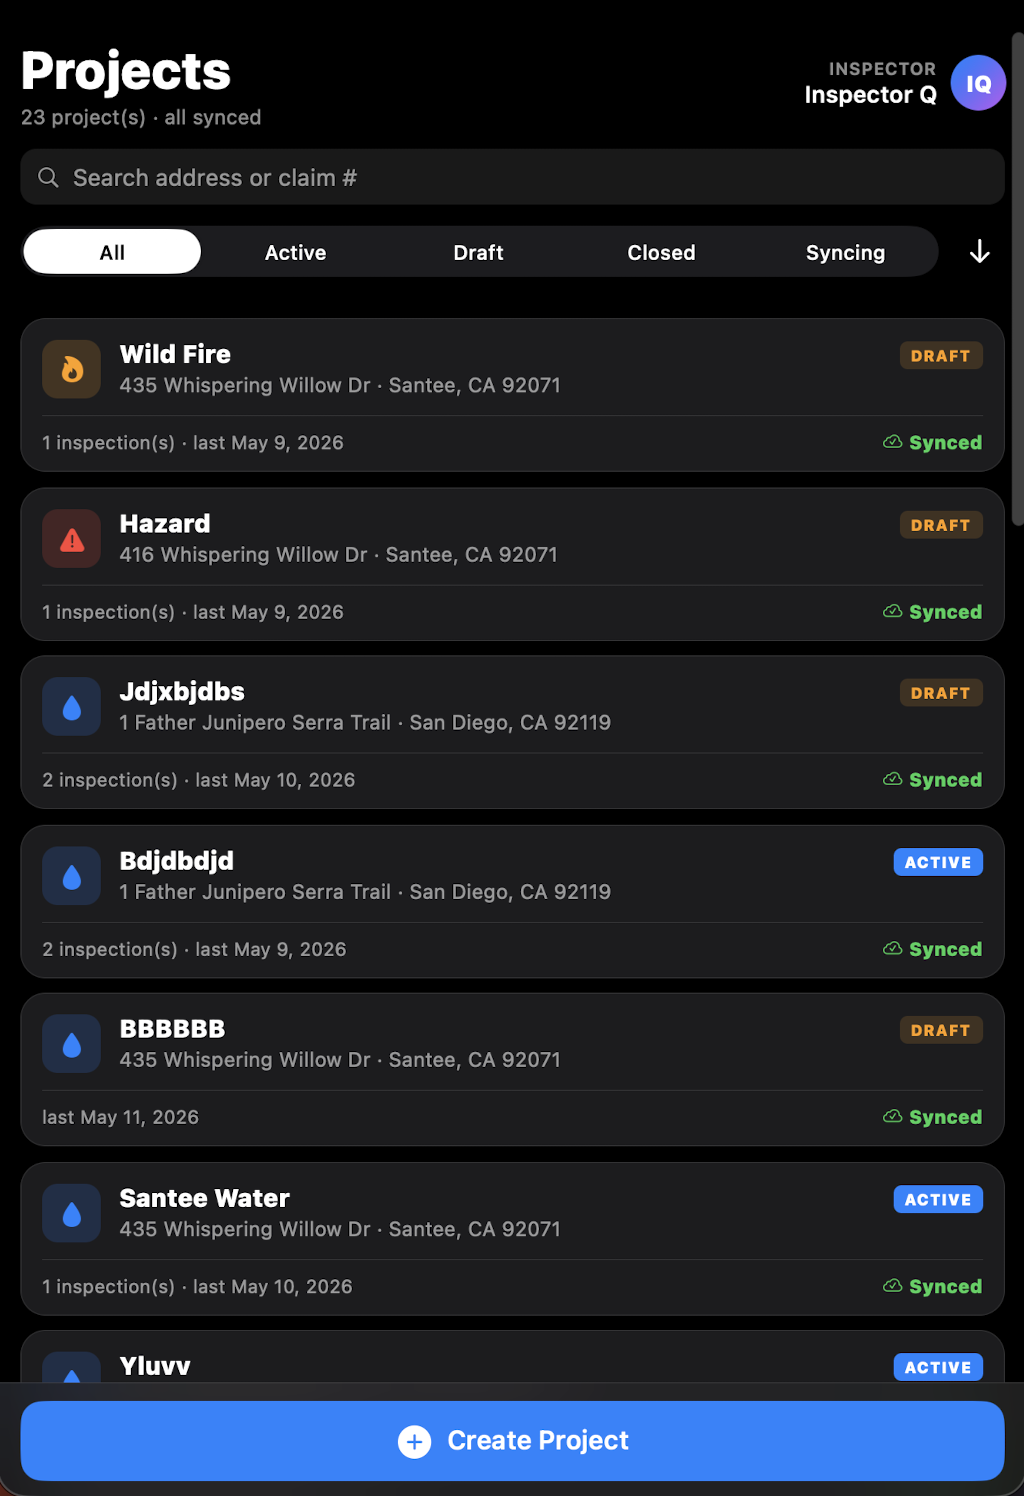
Screen: Projects
The main screen after login — a list of all projects assigned to or created by the inspector.
What you see in the list
- Project name and address
- Loss type (water / fire / mold / storm)
- Last updated date
- Sync status (uploaded / pending / queued)
User menu
Top-right corner shows your initials. Tap to open the profile menu:
- Inspector name
- Privacy: biometric lock (Face ID / Touch ID)
- Face Blur — automatic blur applied to all photos
Actions
| Action | How |
|---|---|
| Open a project | Tap the card |
| Create new | Tap Create Project |
| Search | Search bar — by address or name |
| Sort | Sort button — by date or address |
6. Create & edit project
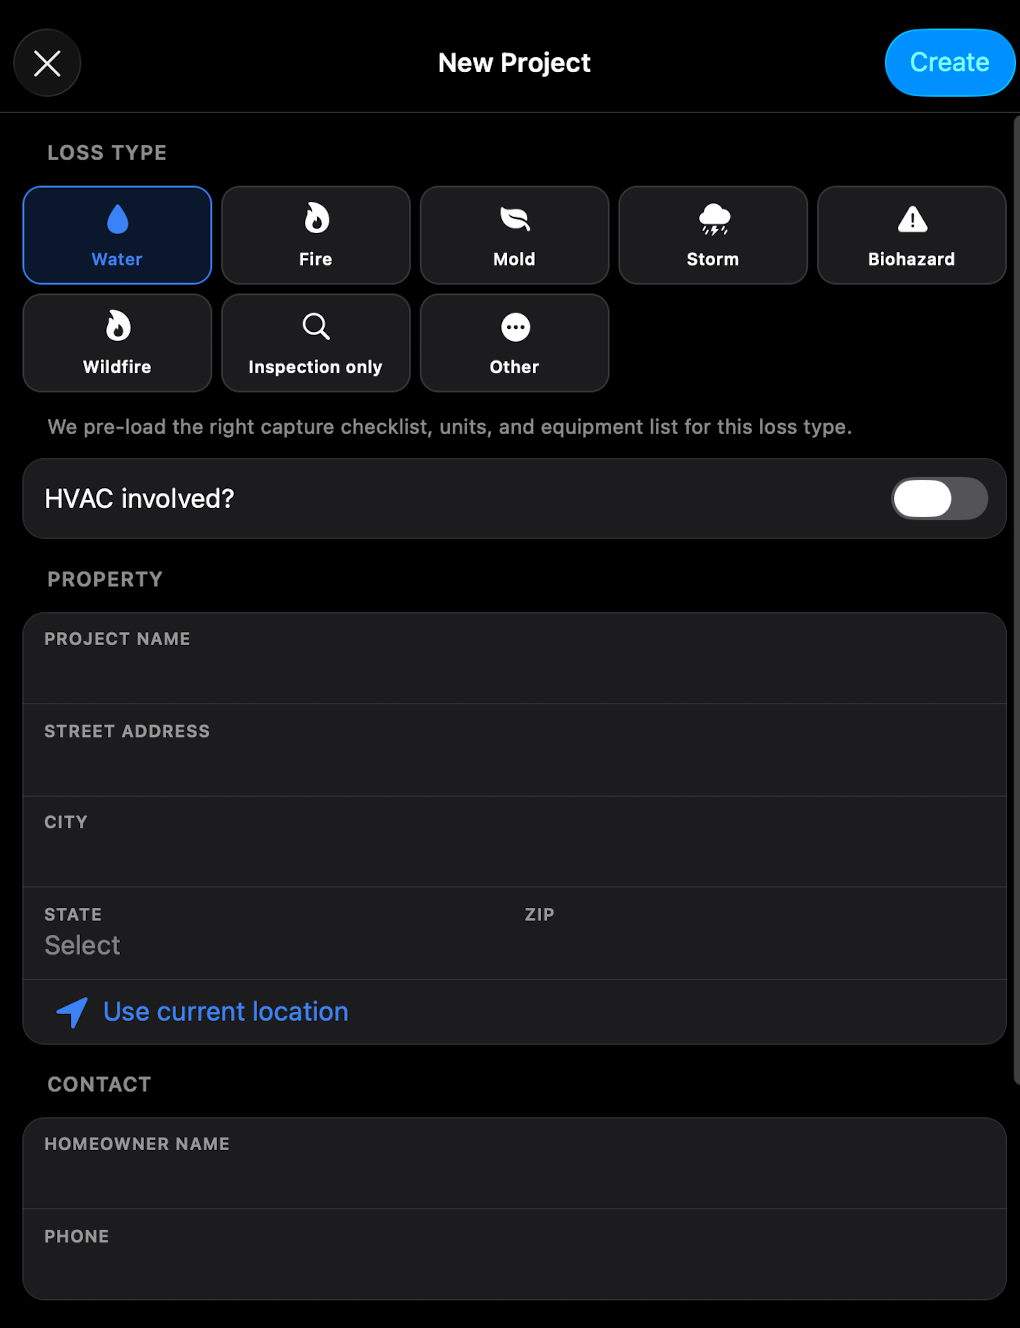
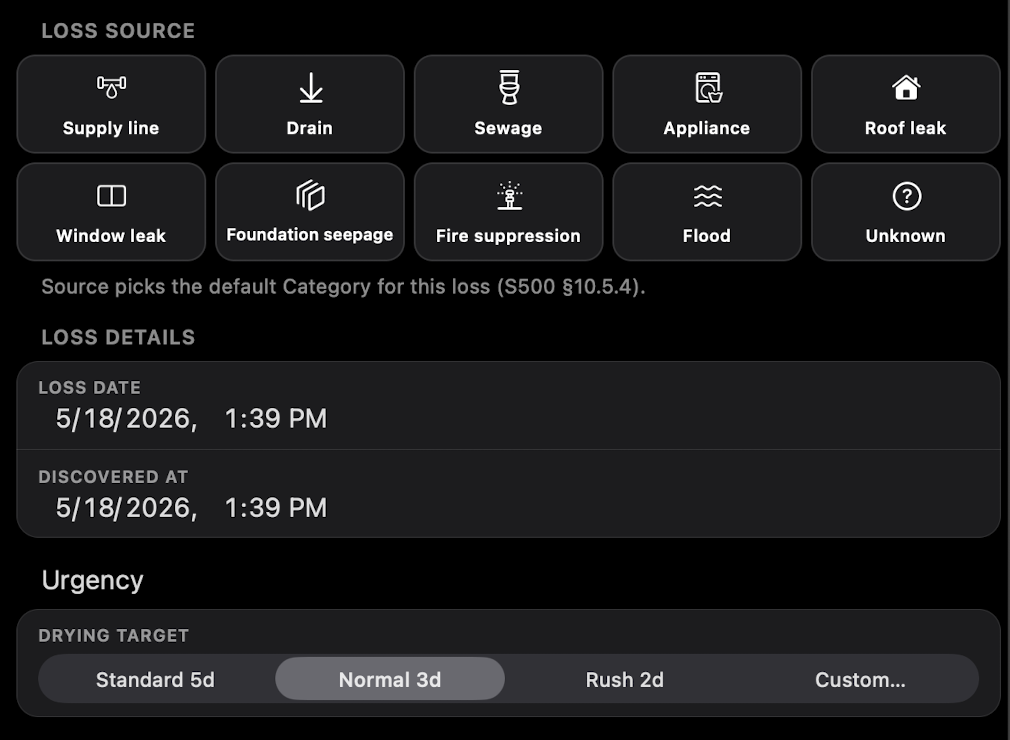
Screen: Create Project / Edit Project
Required fields
| Field | Description | Required |
|---|---|---|
| Address | Street and house number | Always |
| Homeowner name | Property owner's name | Always |
| Loss type | Water / Fire / Mold / Storm / Biohazard / Wildfire | Always |
| Loss source | Cause of loss — e.g. pipe burst, appliance leak (S500 §10.5.4) | Water only |
| Loss date | Date and time of loss (S500 §10.5) | Water only |
| Phone | Contact phone number | Optional |
The loss type determines the entire downstream workflow — which steps appear, which industry standard applies, and how calculations work:
- Water — flooding, pipe burst, leaks. IICRC S500. Requires psychrometrics, daily monitoring, equipment lifecycle.
- Fire & Smoke — IICRC S700
- Mold — IICRC S520 + ASTM D7338 + EPA
- Biohazard — IICRC S540
- Storm — wind and rain intrusion
HVAC Involved — optional toggle at project creation. Enable if the HVAC system was affected by the loss. When enabled, the system adds three extra compliance checkpoints.
Editing
An existing project can be edited via the menu in the project card. Changes are saved locally and synced on the next connection.
7. Project card — the control center
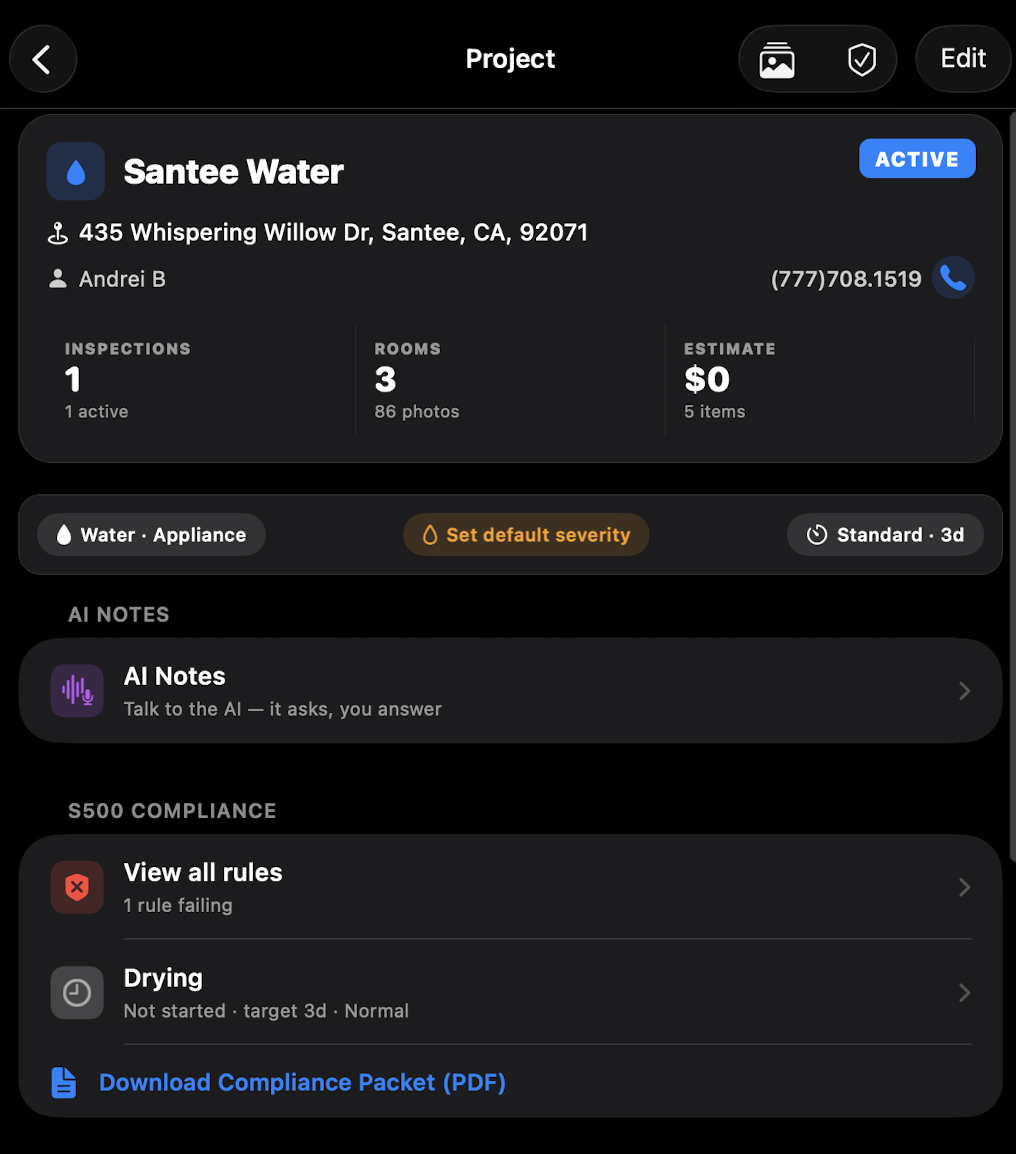
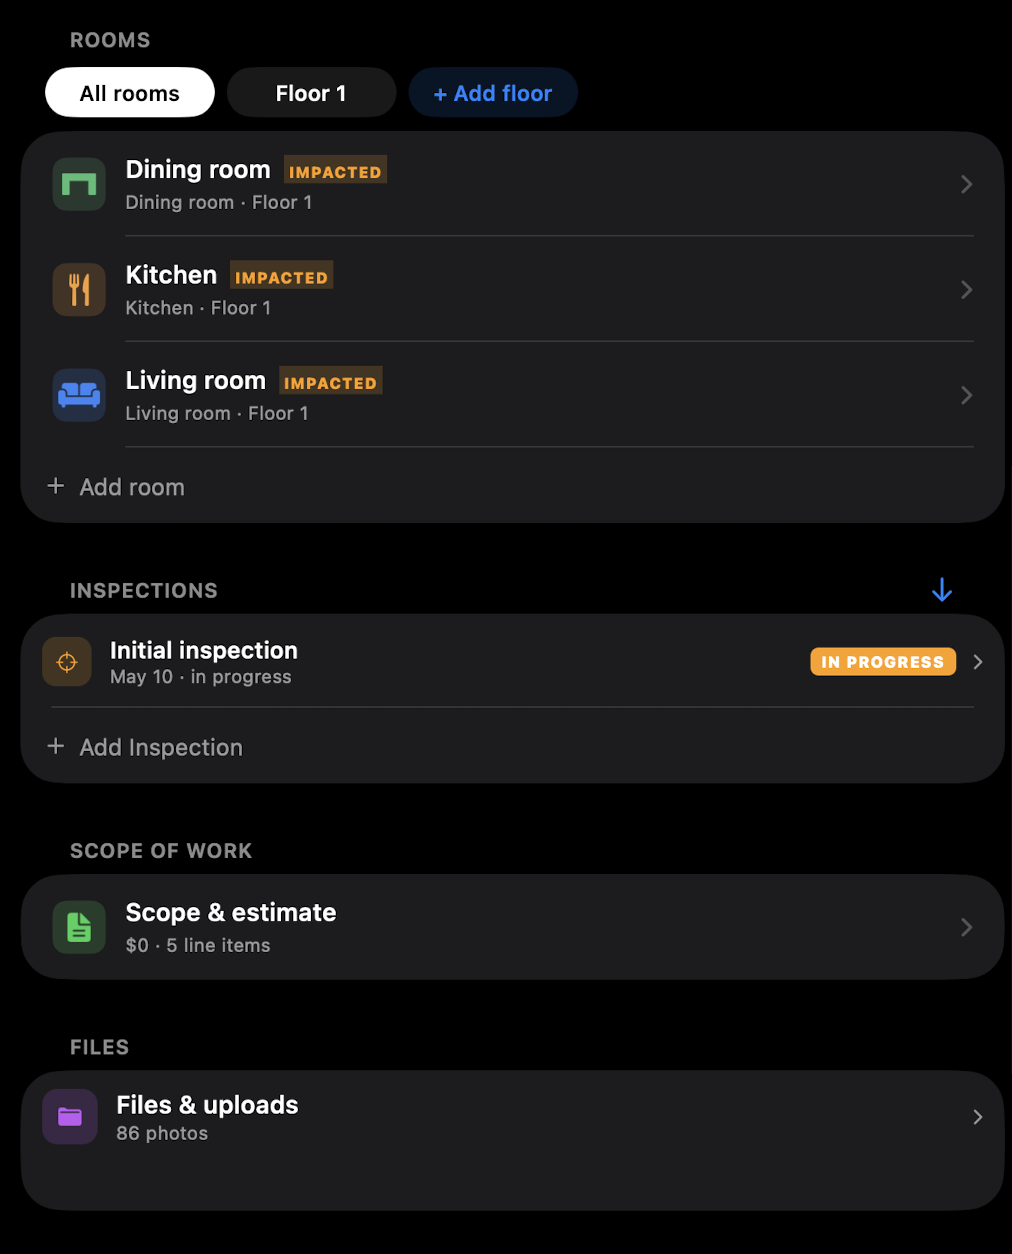
Screen: Project Detail
Opening a project reveals the control center — everything needed to work on site.
Sections of the project card
- Inspections — history of all inspections. The Add Inspection button creates a new one (type: Initial / Monitoring / Demo). Available types depend on the project's loss type.
- AI Notes — voice and text notes processed by AI: structured summaries, scope suggestions, TTS playback
- Compliance — standard compliance status (S500 for Water / S520 for Mold / S700 for Fire). Checklist of required items, color-coded by status.
- Rooms — floor and room list. Add, remove, or rename spaces.
- Scope of Work — work items and estimate with catalog pricing
- Files — all uploaded files (scans, panoramas, SOW PDF, sync log)
- Gallery — all project photos grouped by type and phase. Compare mode for before/after.
7.5. Adding an inspection & the Inspection screen
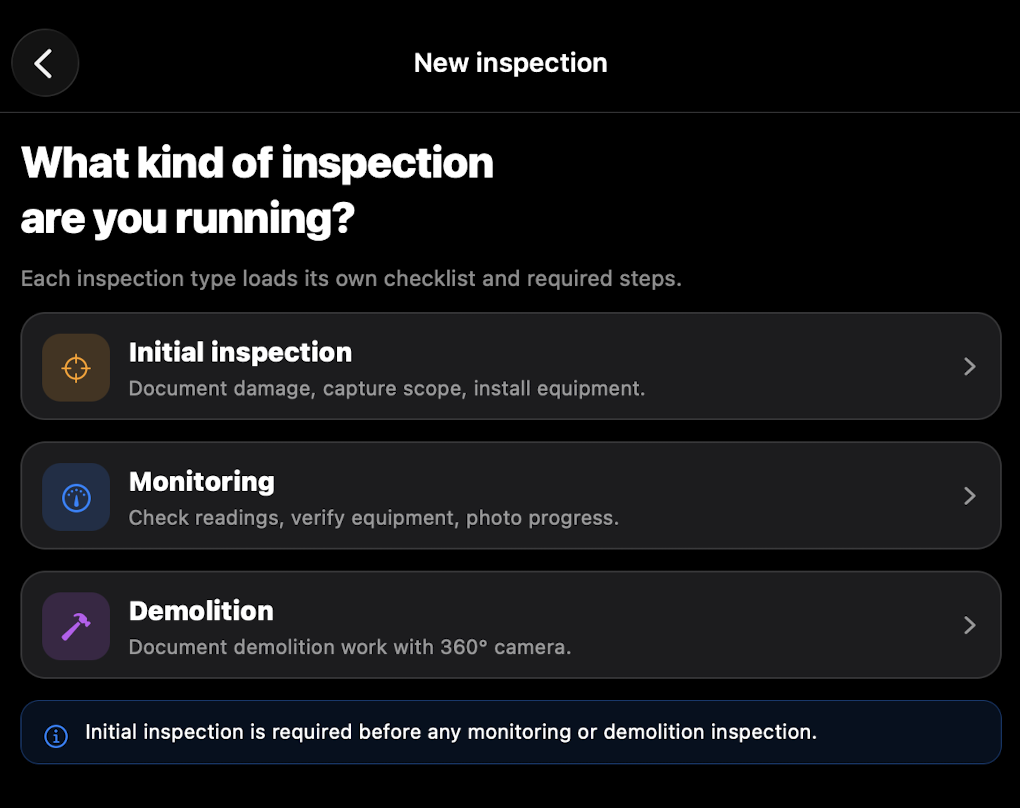
Tapping Add Inspection in the project card opens a type selection sheet. Available types depend on the project's loss type:
- Initial — first inspection. Damage documentation, equipment install, homeowner authorization.
- Monitoring — daily check. Moisture readings, equipment check, psychrometric data.
- Demo — demolition documentation. Timelapse, step-by-step demolition checkpoints.
Inspection Window
After creating an inspection, the main Inspection Window opens. It organizes all steps into three groups:
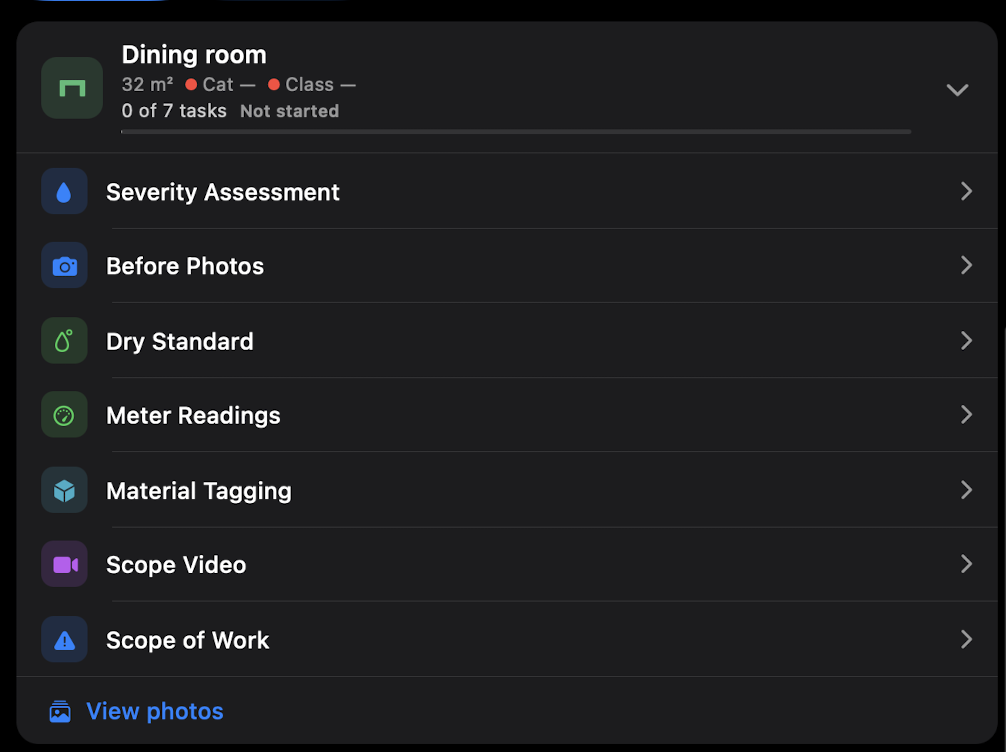
- Inspection-wide — required steps completed once for the entire inspection. For Initial: Exterior Photo → Loss Details → Select/Create Room → Scope Video → Equipment Calc → Install Equipment → Work Auth
- Per-room — steps listed under each room, organized by floor. Each room expands on tap. Completed steps are checked off.
- Optional — non-required general steps (Panorama, RoomPlan, 3D Scan) in a section at the bottom.
At the top of the Inspection Window is the project card with S500 context and horizontal floor scrolling. Inspection progress is visible from the project card.
8. Initial inspection — arriving on site
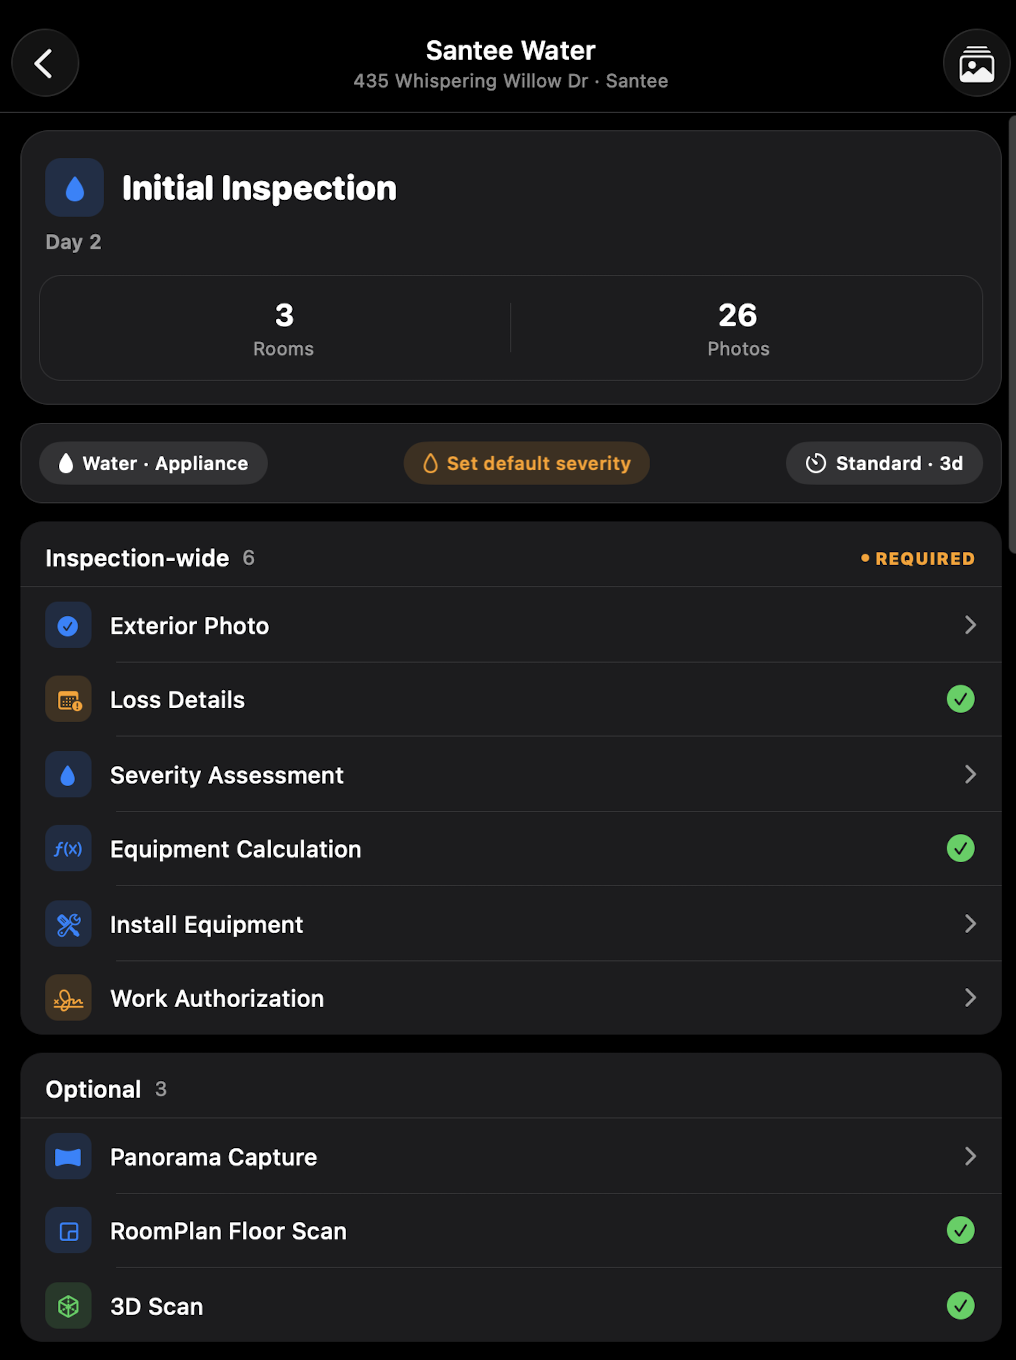
Screen: Initial Inspection
The first step of any inspection is a photo of the building exterior or address placard. This required step captures the inspector's GPS arrival time.
How it works
- Tap Add Inspection in the project card
- Select the inspection type: Initial / Monitoring / Demo
- The camera opens — photograph the exterior or address placard
- The system compares the address in the photo with the project address (OCR check)
- Tap Continue or Re-take if the shot is unclear
What is logged automatically
- Arrival timestamp
- GPS coordinates
- Photo automatically linked to this inspection
Loss details
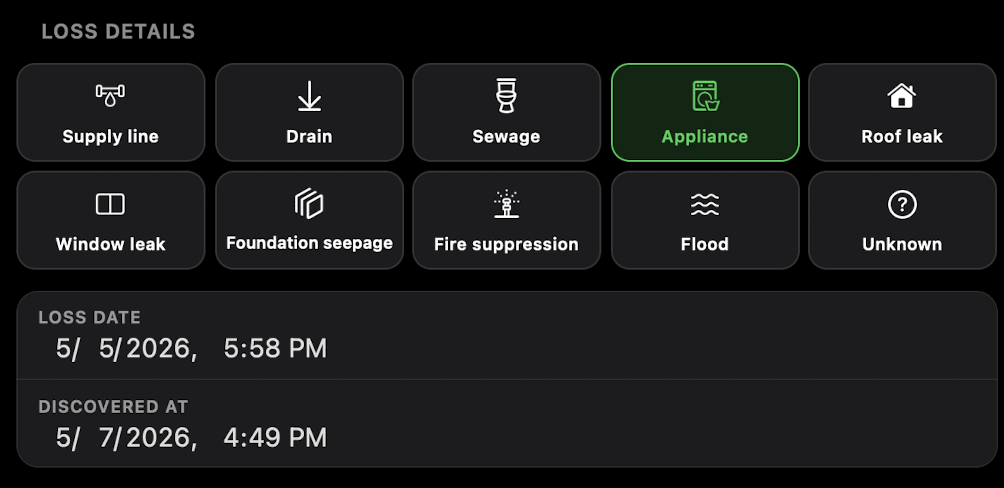
Screen: Edit Project → Loss Details section
The second required Inspection-wide step. The inspector fills in the circumstances of the loss — data required by S500 §10.5 and needed for the compliance report.
Fields
- Loss Source — cause of loss (for Water: Pipe Burst / Appliance Leak / Toilet Overflow / Sewer Backup / Flood / Storm Intrusion / Other). The source determines the initial water category.
- Loss Date — date and time of loss. Used for the Category Conversion Warning (if more than 24–48 hours have elapsed, the system warns of possible category escalation).
- Discovered At — date and time discovered. May differ from Loss Date (e.g. the owner was away). Defaults to Loss Date.
9. Rooms & layout
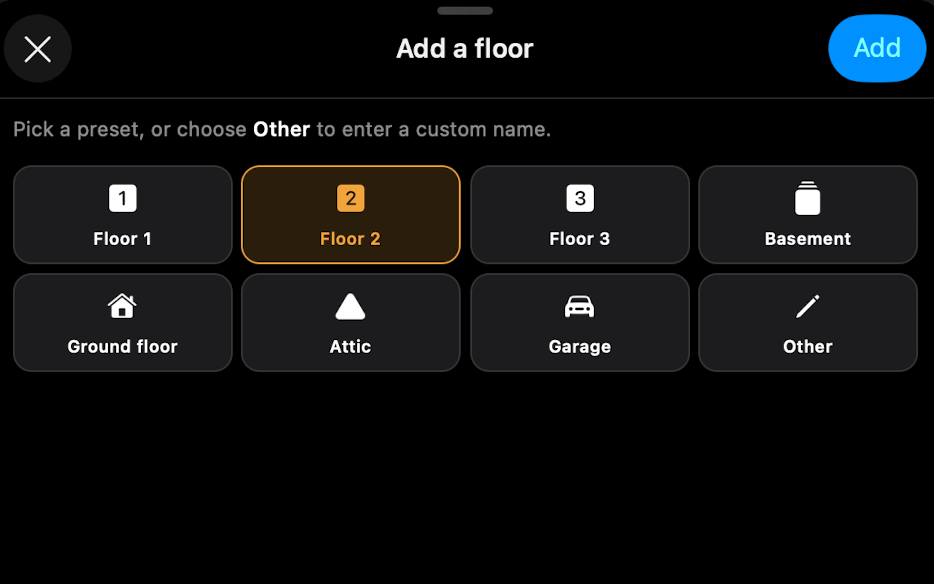
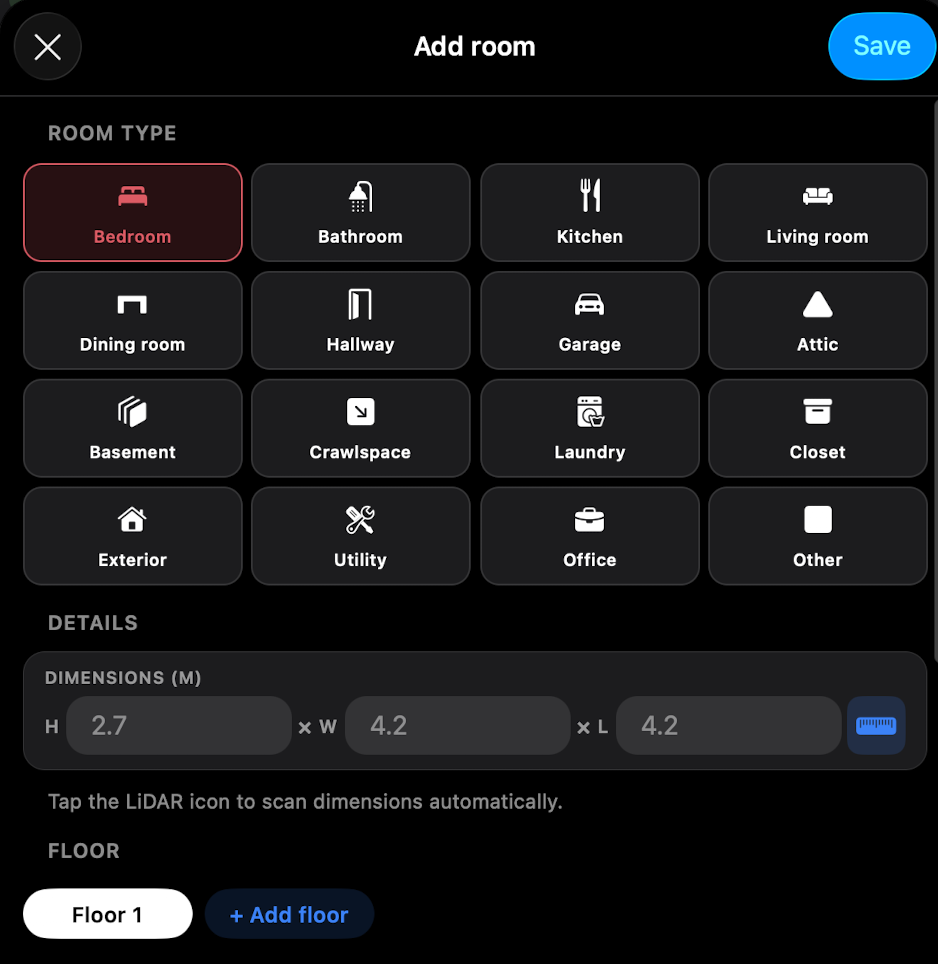
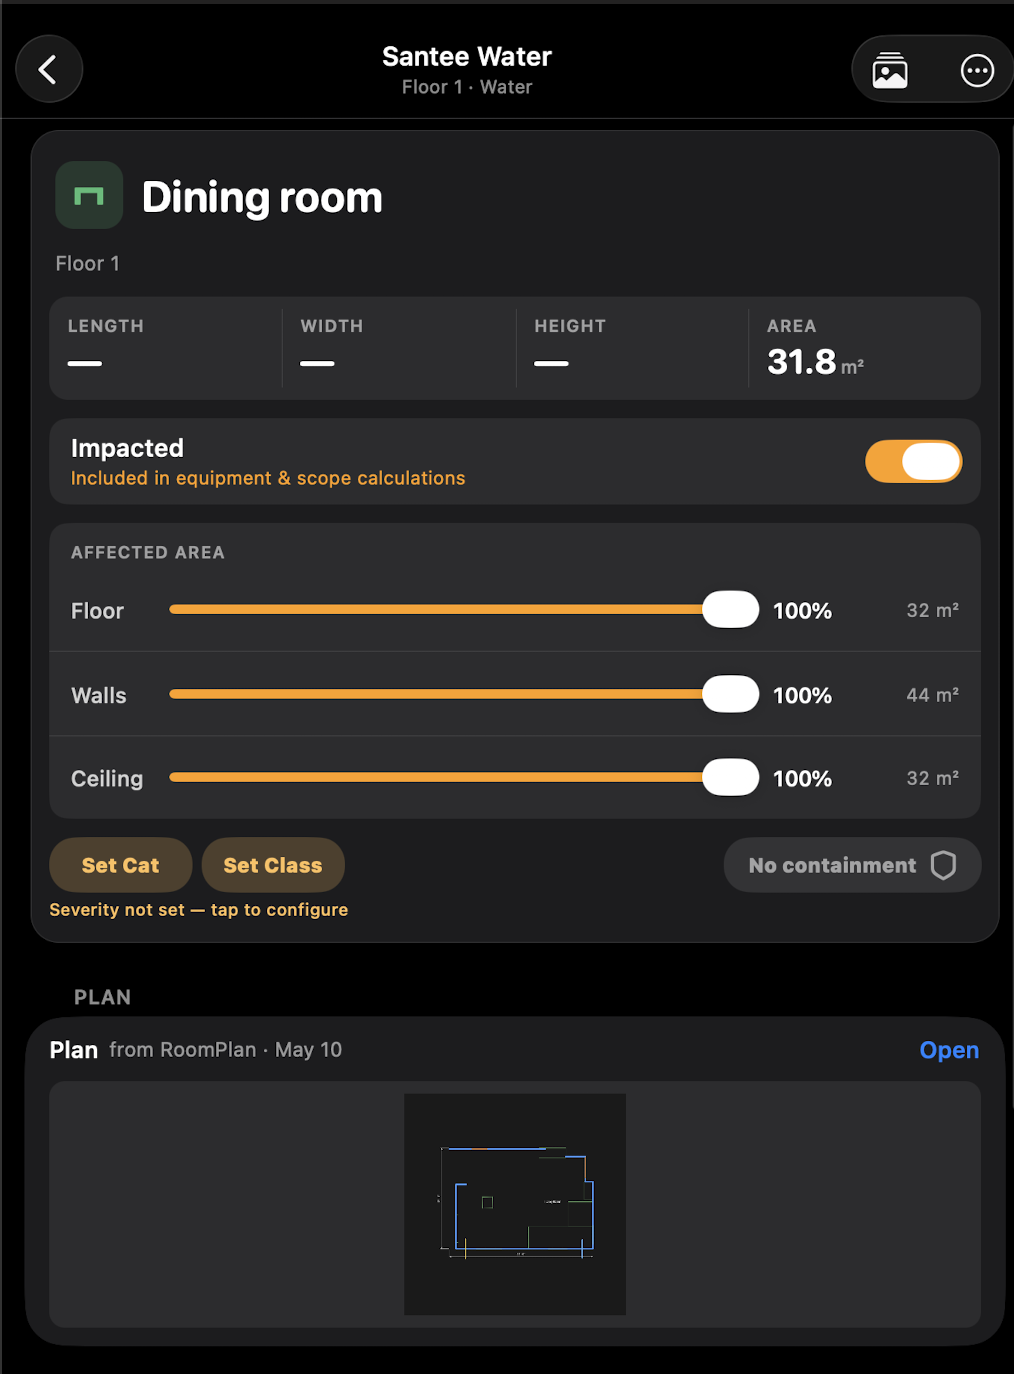
After arrival the inspector sets up the building structure: floors and rooms. This structure is reused across all subsequent visits.
Adding floors
- Basement / Ground Floor / 1st Floor / 2nd Floor / Attic — standard options
- Custom name also available
Adding rooms
For each floor, add spaces: Bedroom / Kitchen / Bathroom / Living Room / Hallway / Garage / Exterior / and others. Each room gets a unique ID; all photos, readings, and equipment are linked to it.
Why structure rooms upfront
- Workflow steps like "Before Photos" and "Meter Readings" automatically expand across all rooms
- Equipment calculation runs per room based on each room's floor area
- SOW groups work items by room
- Monitoring shows a moisture trend chart per zone
10. 3D room scanning
The app supports multiple 3D documentation technologies. Choose based on the job and the equipment available.
10.1 RoomPlan — floor plan (recommended)
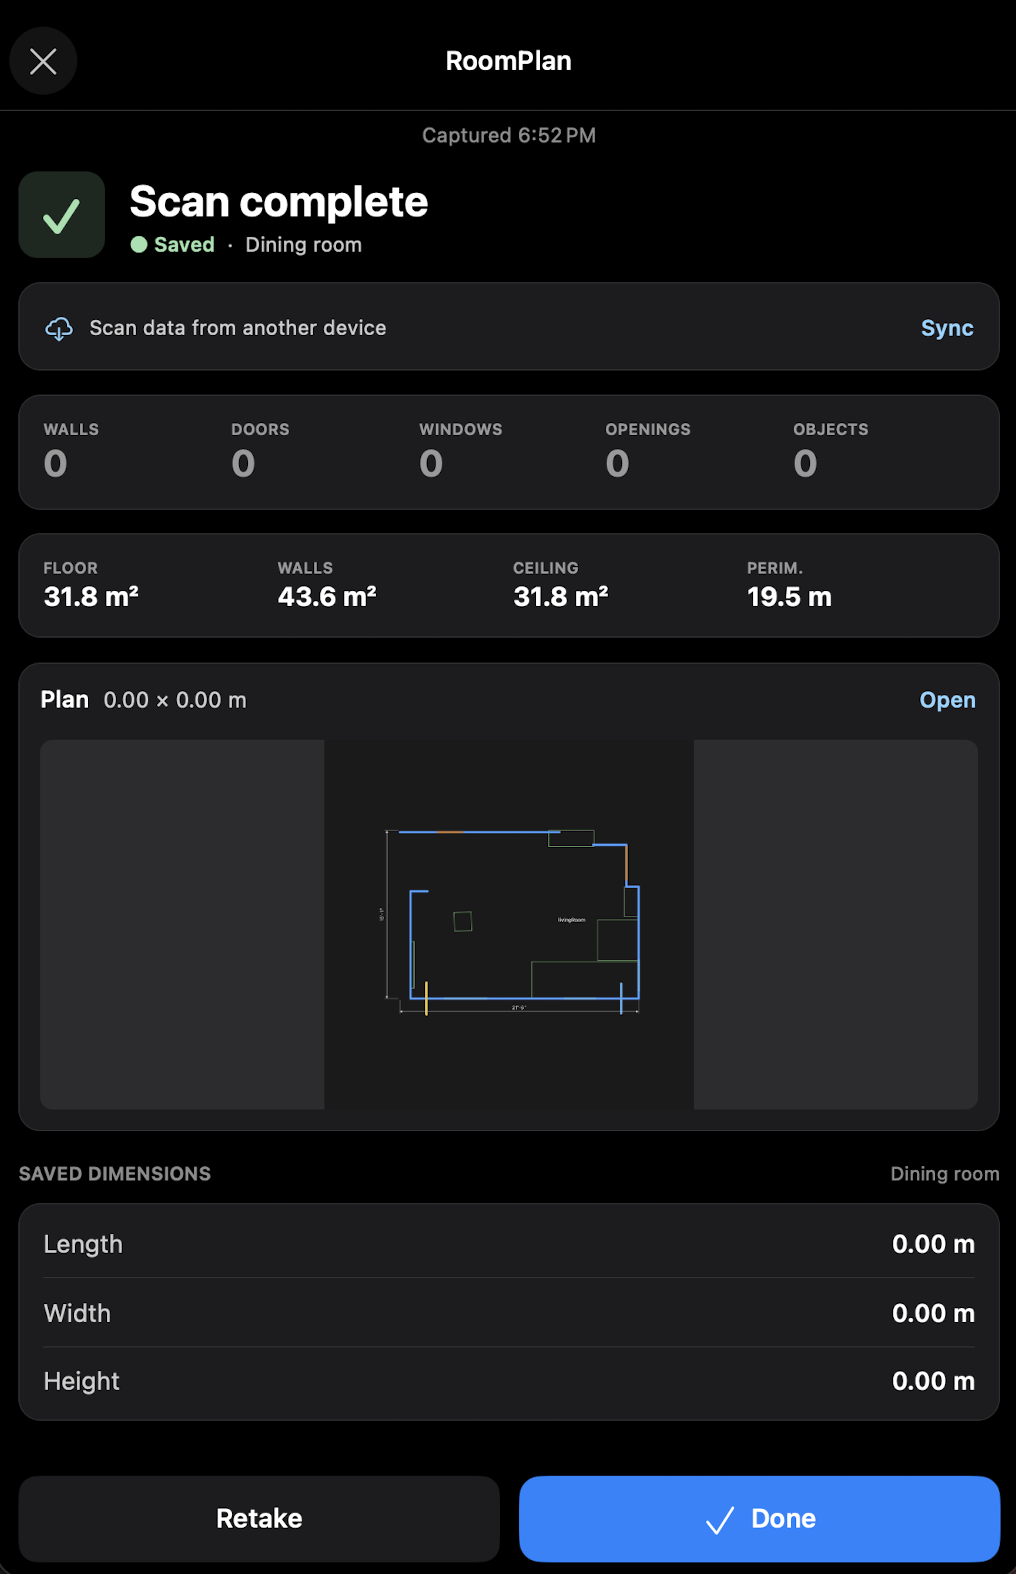
Screen: RoomPlan Scan
Uses the LiDAR sensor on iPhone/iPad Pro models. The fastest way to get an accurate floor plan.
How to scan:
- Enter RoomPlan mode from the workflow step or the menu
- Slowly sweep the camera around the room perimeter
- A 3D plan with walls, doors, and windows builds in real time
- Tap Done when complete
What you get:
- Accurate floor area → automatic equipment calculation
- Floor plan exported to SOW
- Dollhouse view for the office and carrier
- QR codes on walls let photos pin to exact spots in the 3D model
Scan time: 1–3 minutes per room
10.2 RTABMap — full 3D reconstruction
Screen: RTABMap Scan
For jobs that need a detailed 3D model of the entire building (large losses, litigation cases).
- Tap Start — point cloud recording begins
- Slowly walk through all rooms, capturing every corner
- Tap Stop — local processing begins
- Result: full 3D model. Viewing link appears in the project card.
- Works without LiDAR (any iPhone with TrueDepth or standard camera)
- Scanning can be paused and resumed
- Model file uploads to server; link appears in Files
- Time: 5–10 minutes depending on the building
10.3 Panorama — spherical panorama
Screen: Panorama Capture
For quick 360° documentation without LiDAR. Modes: iPhone Panorama (standard) or Sphere (full spherical sweep).
10.4 Ricoh Theta — external 360° camera
Screen: Ricoh Theta Scan
Connects to the Ricoh Theta camera over Wi-Fi. Used for high-quality spherical captures during Demo inspections.
11. Photo documentation
Screens: Photo Capture / Photo Detail / Compare Photos / Severity Selection
Photos are the foundation of insurance documentation. The app organizes them automatically.
Photo phases
| Phase | When taken | What to photograph |
|---|---|---|
| Before | Before any work begins | Overall room view, all damage |
| Meter | During readings | Close-up of meter display + position context |
| During | While work is in progress | Demolition progress, structural conditions |
| After | On drying completion | Post-work condition, every zone |
| Equipment | Install / check | QR code on unit, placement |
| Scope | Video dictation | Damage zones + voice description |
How to shoot (Photo Capture)
- Open the step from the workflow (e.g. "Before Photos — Bedroom")
- Select intent: Overview / Closeup / Context
- Tap the shutter button
- If needed — retake or add a note
Damage severity
After a photo you can set the damage severity: None / Minor / Moderate / Severe / Total Loss. The AI classifier automatically suggests a rating; the inspector confirms.
Before / After comparison
Screen: Compare Photos. A slider to compare the before and after condition — used in reports and at claim close.
Privacy
- The app automatically blurs faces in photos (Face Blur)
- Blurred photos are stored separately from originals
- Originals are kept locally and never transmitted unprotected
Zoom control
All cameras support zoom: 0.5× / 1× / 2× / 3× — buttons available directly in the capture UI.
12. Moisture readings
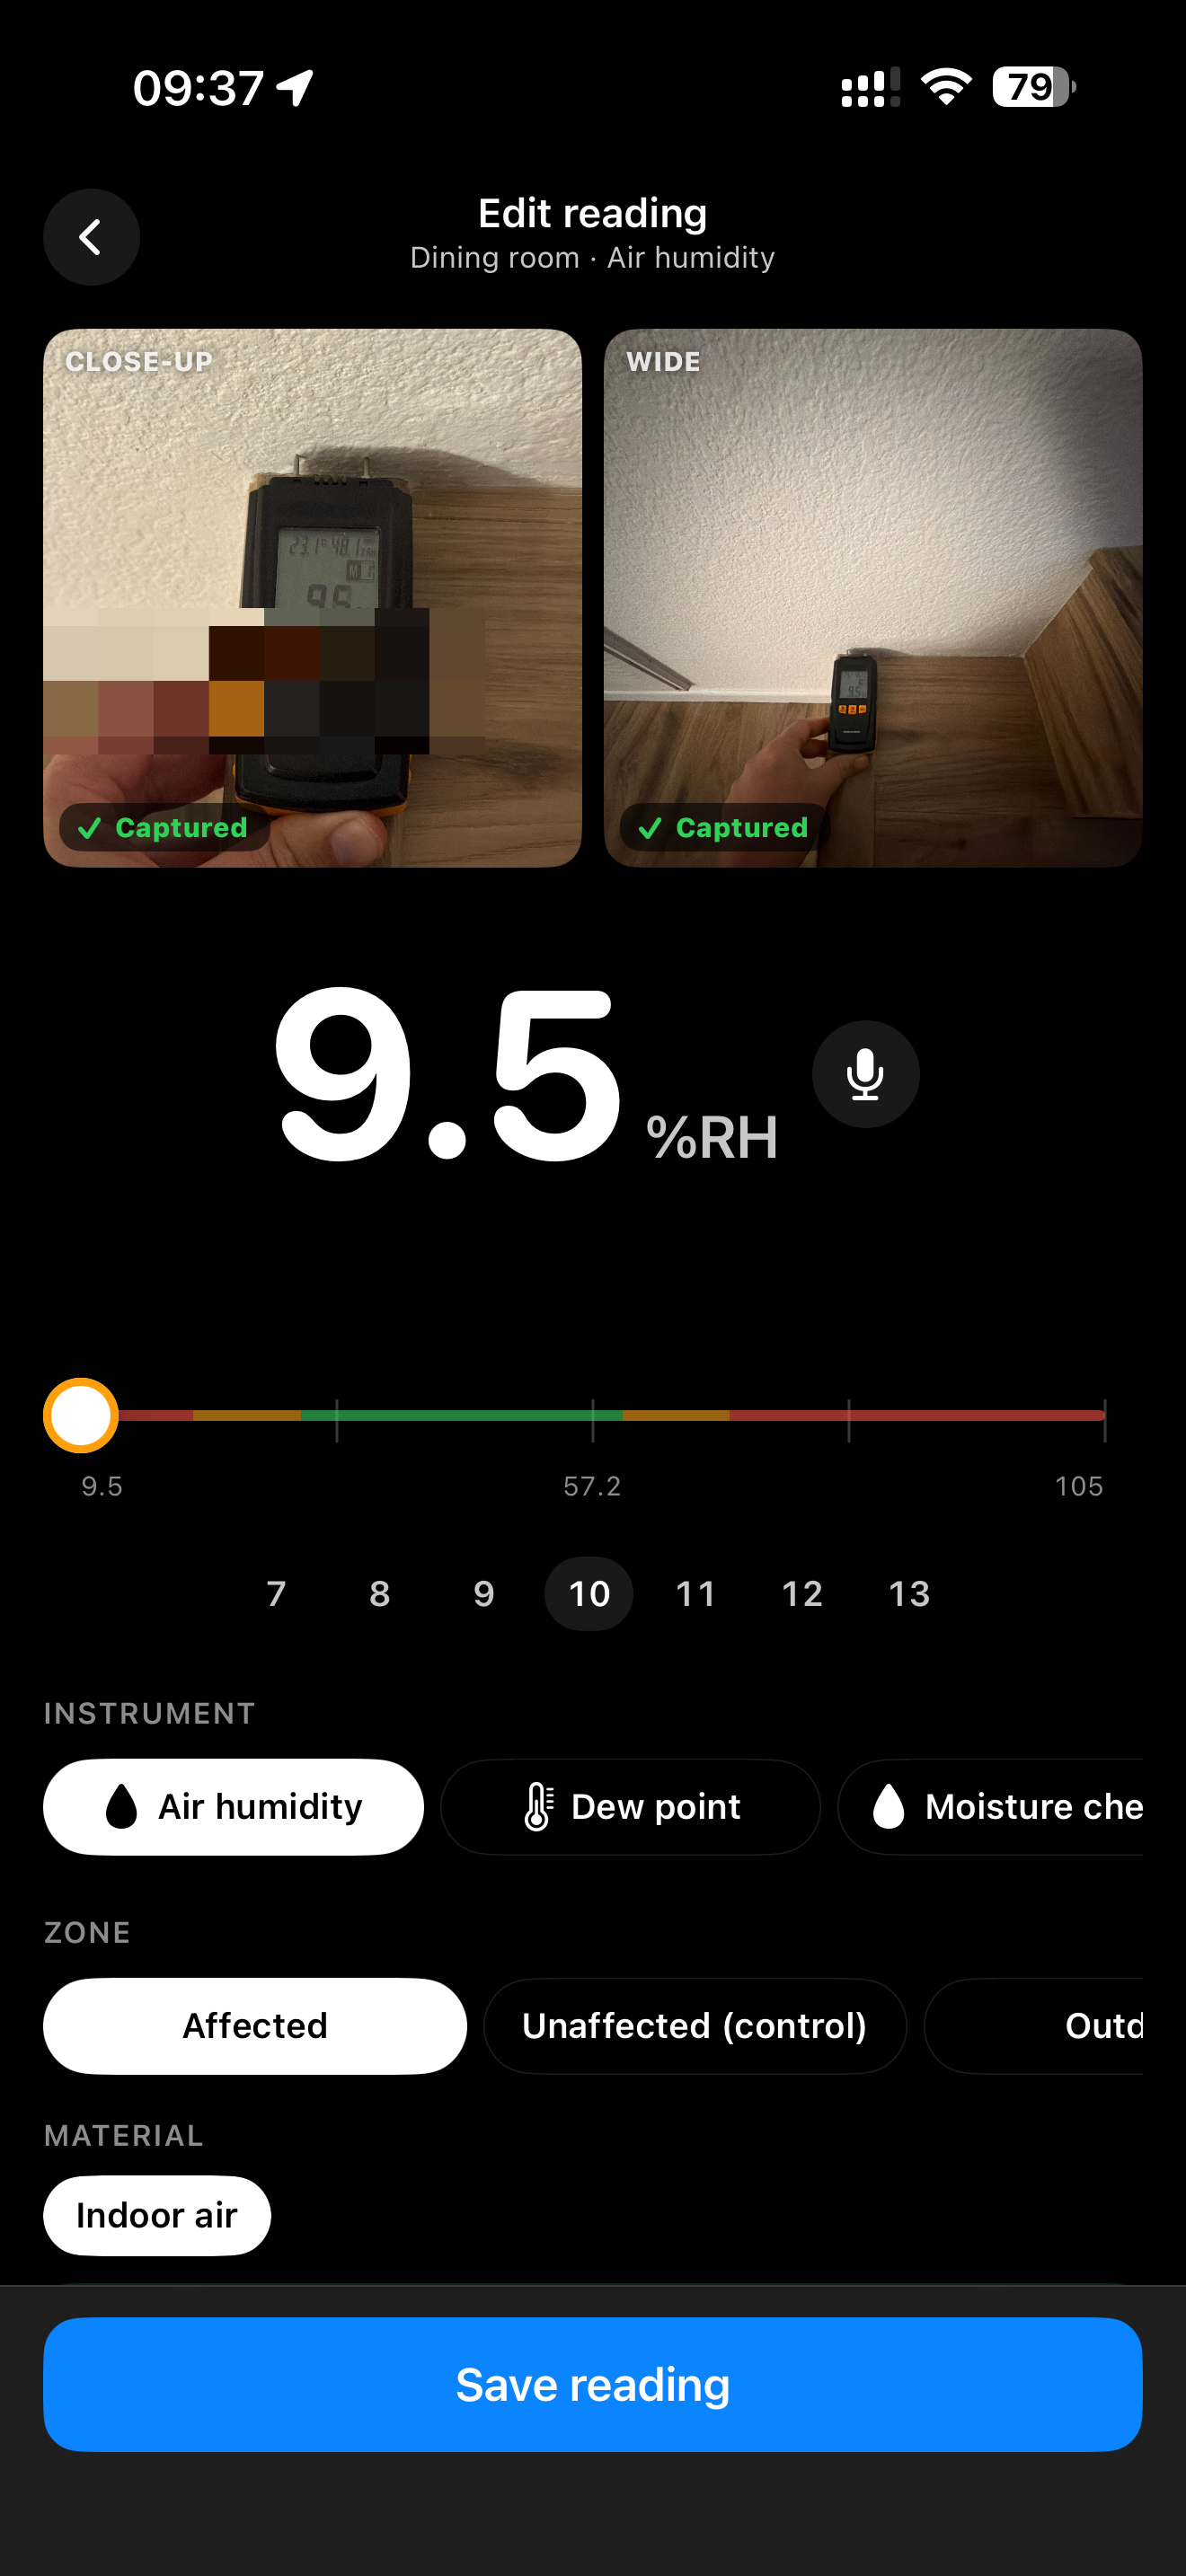
Screens: Meter Reading Capture / Meter Readings List
Moisture documentation is the core process for water losses. The app automatically reads the meter display.
How to take readings
- Open the Meter Readings step for the room
- Press the probe against the surface, take the reading
- Photograph the meter display close-up — OCR reads the numbers automatically
- Digital display → accurate OCR; analog gauge → AI analysis
- If OCR is confident, the value is already filled in. Verify and confirm.
- If not confident — enter manually or by voice
- Select the material (drywall / concrete / wood / etc.) and measurement type (moisture / temperature / GPP)
- Optional — take a second Context photo showing where on the wall or floor the reading was taken
What is saved
- Numeric reading value
- Material and measurement type
- Close-up photo of the display
- Context photo (reading position)
- Timestamp + linked to room and inspection
Reading history
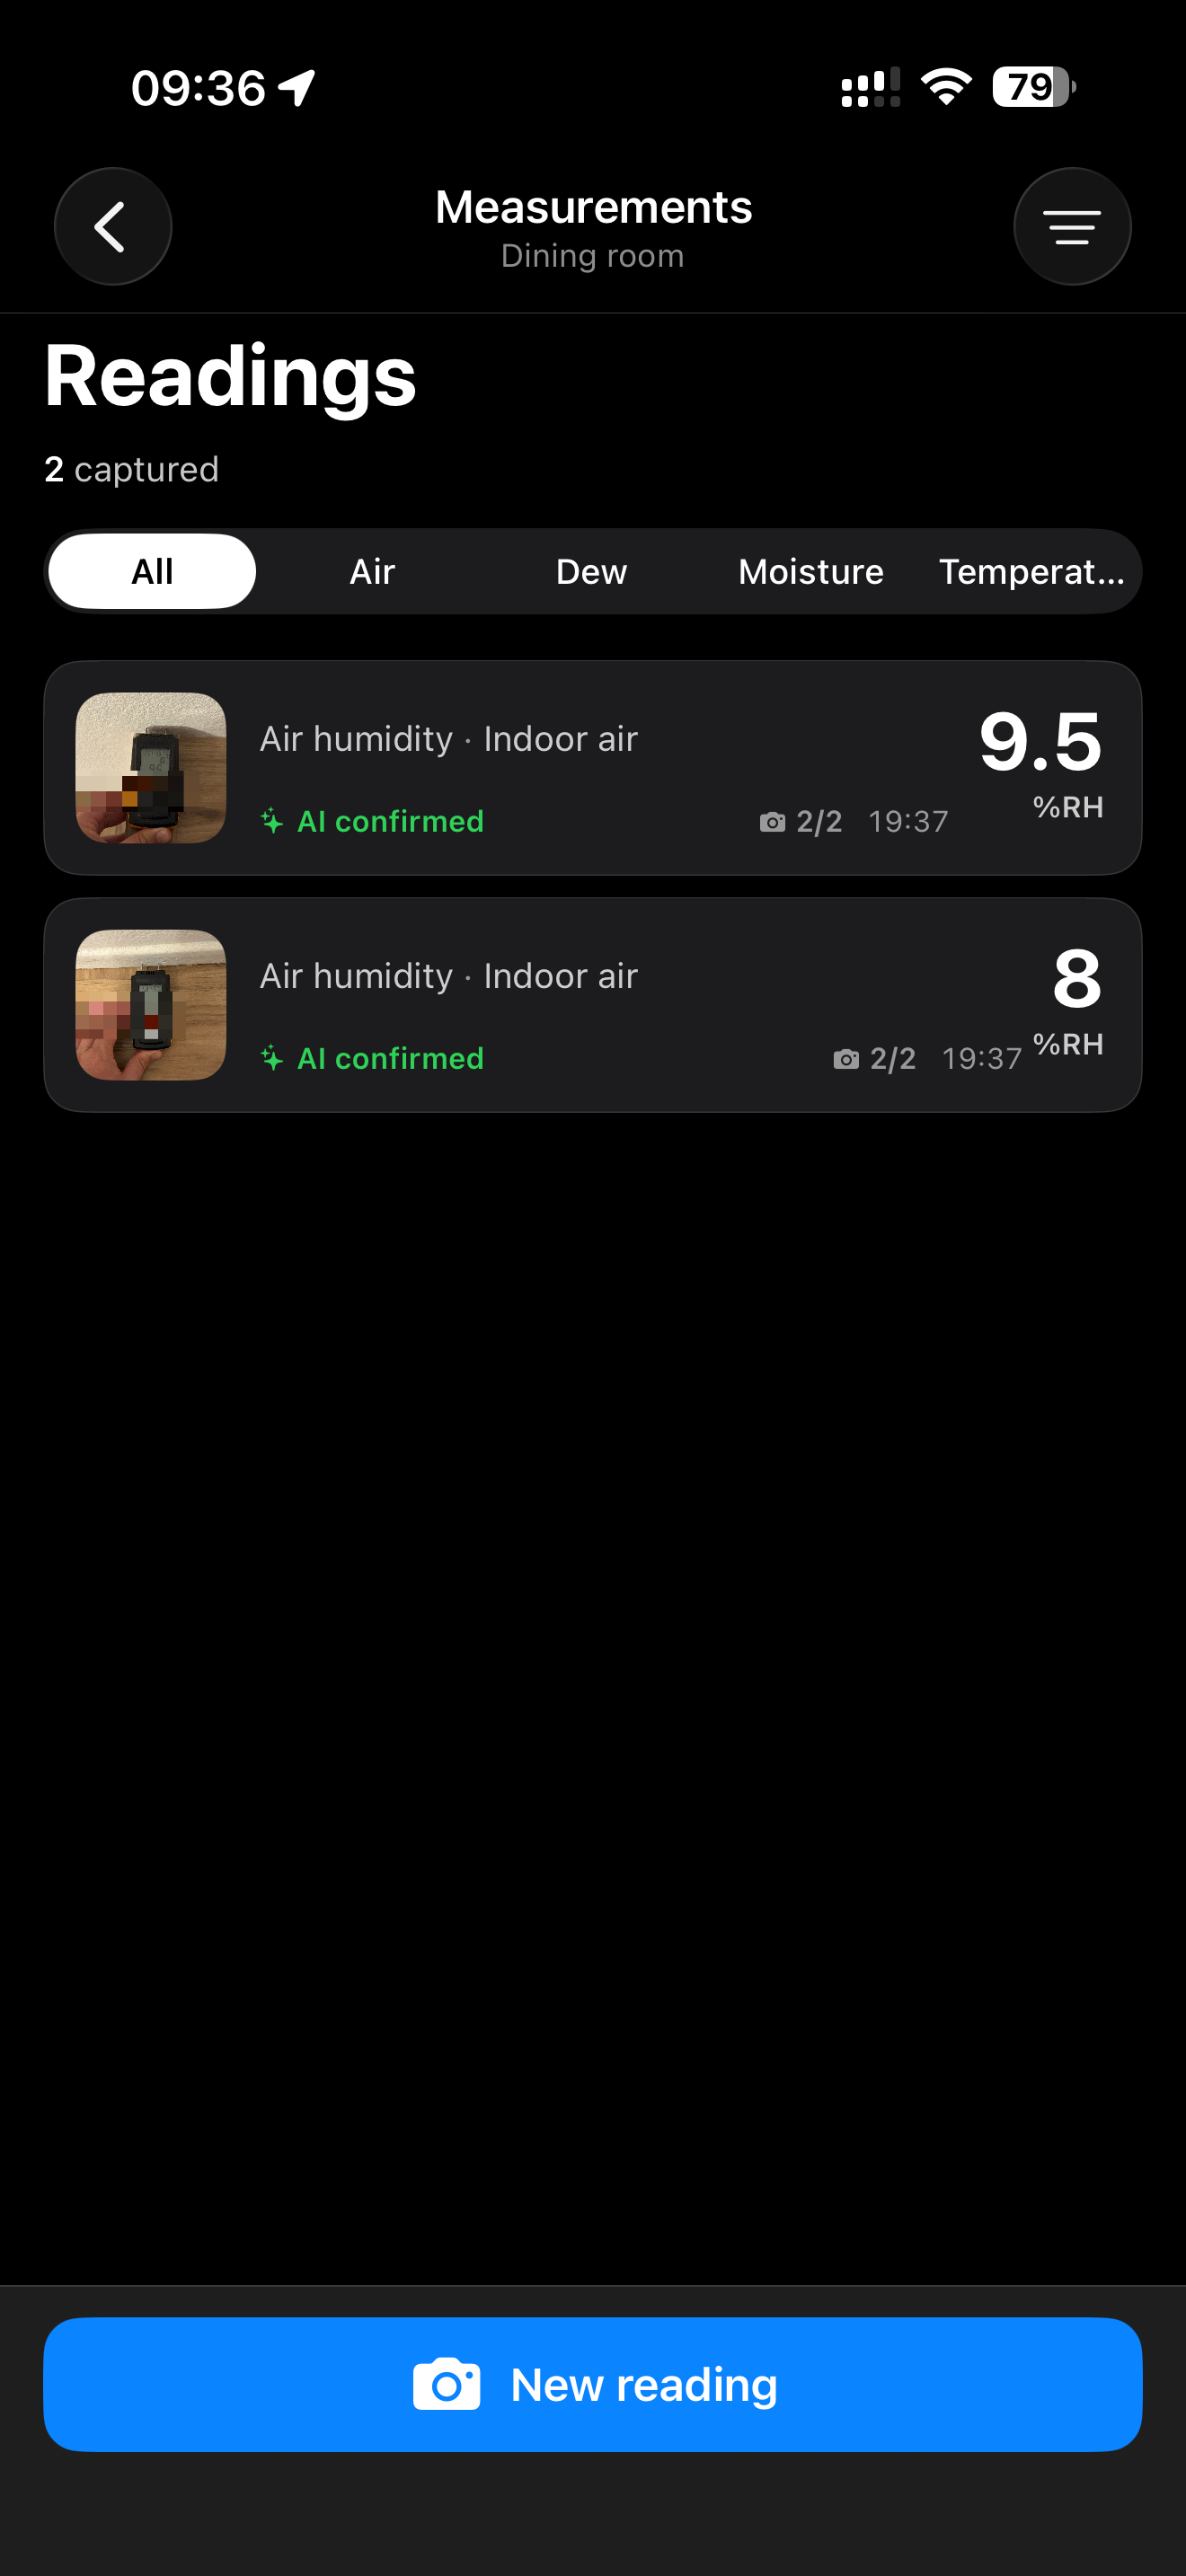
Screen: Meter Readings List
- All readings for the room across all visits
- Daily trend: is the reading moving toward the target value?
- Target value calculated from the unaffected reference material (S500 dry standard)
13. Equipment — calculate, install, track
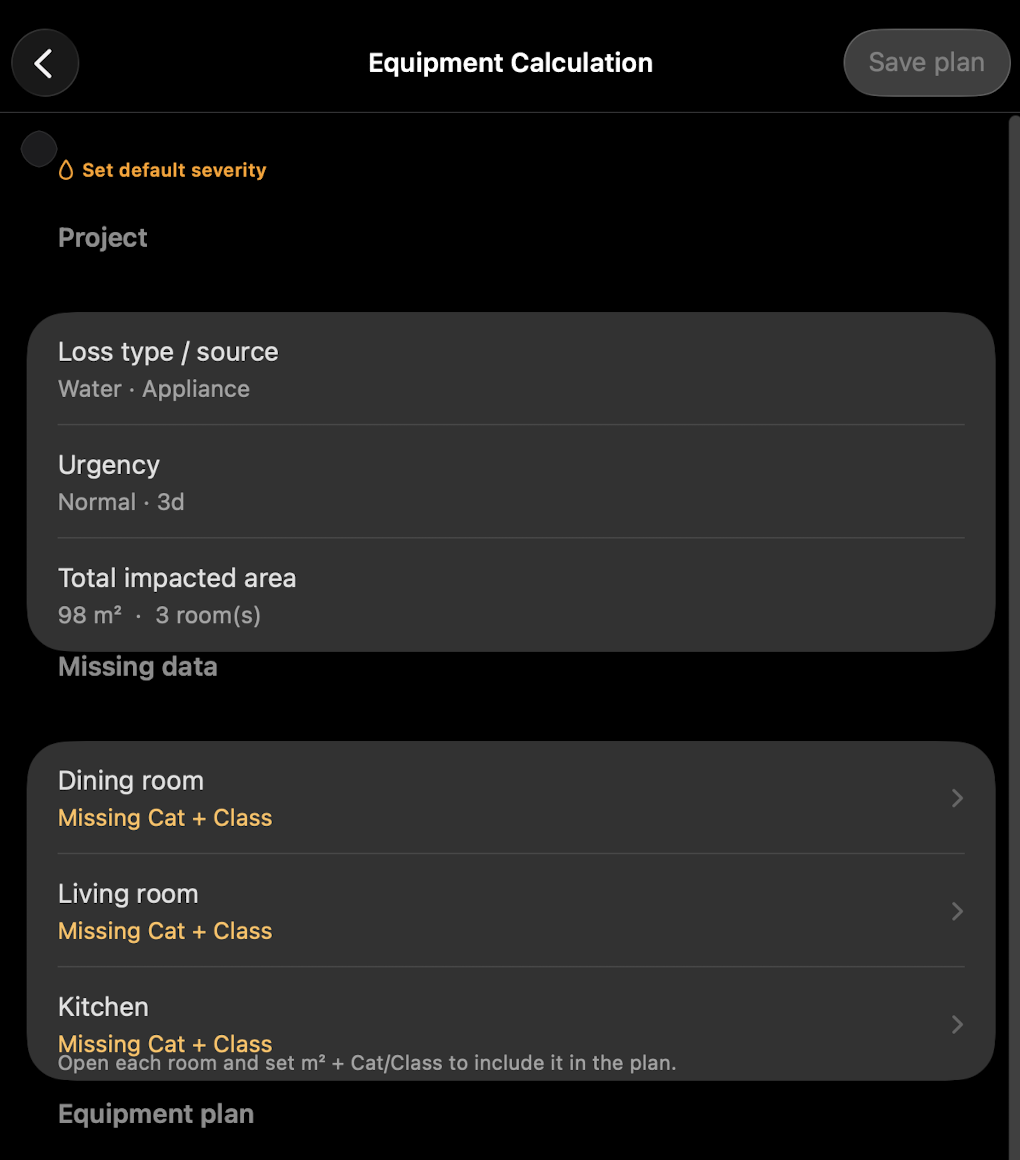
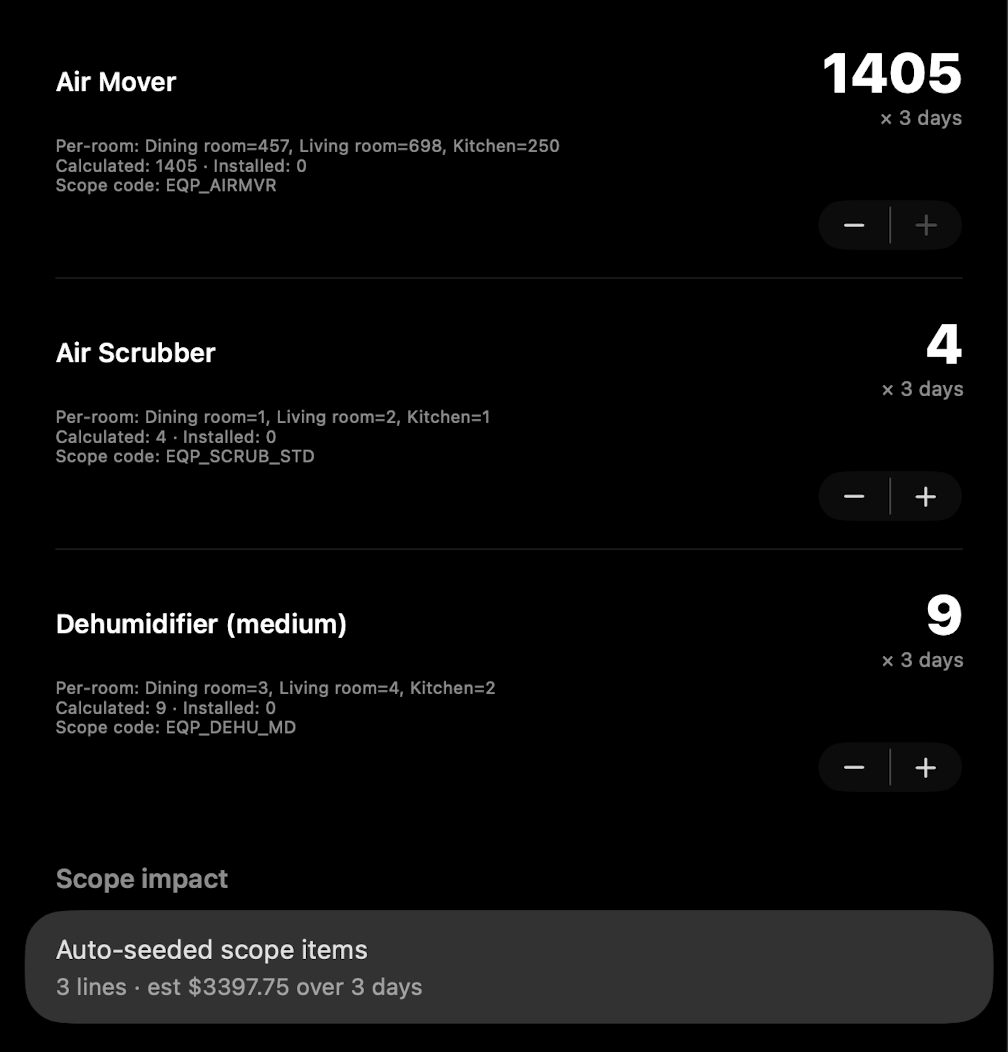
Screens: Equipment Calc / Equipment Detail Form / Equipment Scanner / Equipment Check Result
Equipment calculation (Equipment Calc)
After room scanning the system knows each room's floor area. Based on loss type and area it automatically calculates the equipment needed per S500 formula:
Bedroom (320 sqft)
  Dehumidifier:  2 units   (1 per 200 sqft)
  Air Mover:     4 units   (1 per 100 sqft)
  Air Scrubber:  1 unit    (1 per 500 sqft)

Kitchen (180 sqft)
  Dehumidifier:  1 unit
  Air Mover:     2 units
  Air Scrubber:  1 unit

TOTAL:
  Dehumidifier:  3
  Air Mover:     6
The inspector can adjust numbers manually (e.g. due to ventilation specifics). The original calculation is preserved for audit.
Installing equipment
- Bring equipment to the job site
- Open the Install Equipment step
- Scan the QR code on each unit — links the serial number to the project
- Photograph the unit in its installed position
- Each action is logged in the system
Equipment check / monitoring
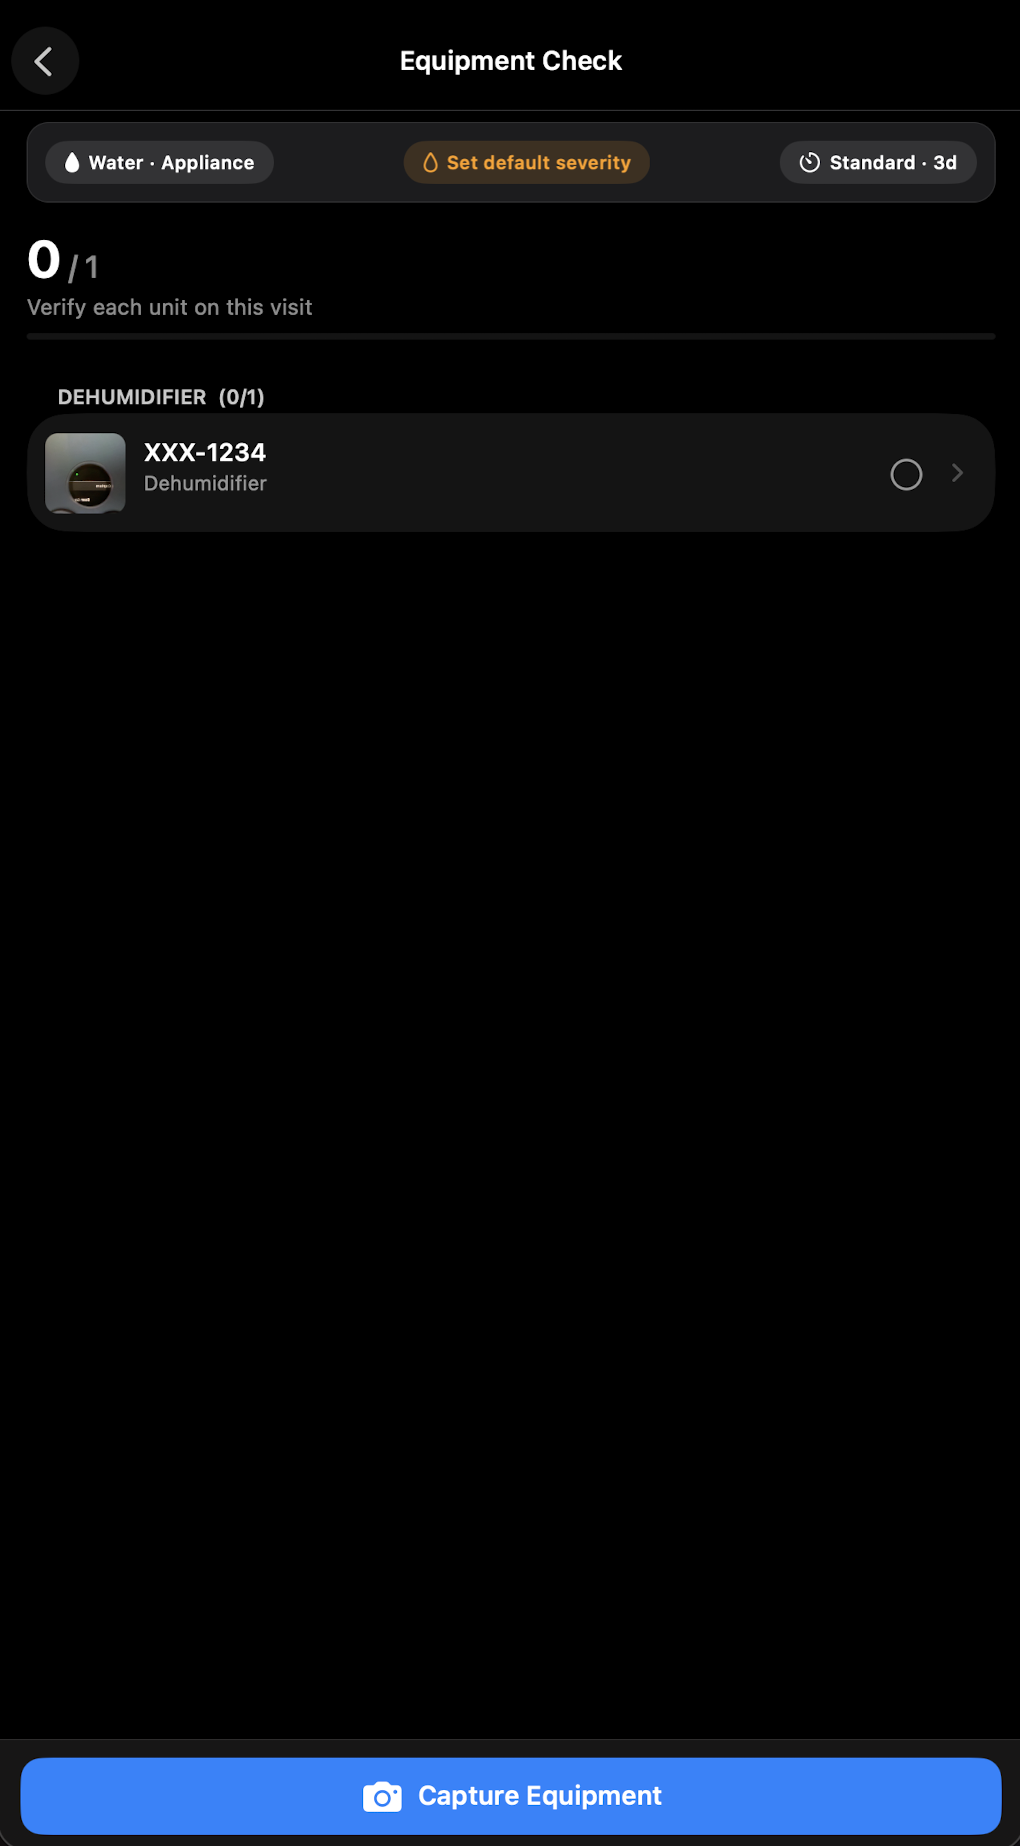
On every monitoring visit:
- Open the Equipment Check step
- Scan the QR code on each unit
- Check readings (reservoir capacity, operating mode)
- Photograph if needed
Removing equipment
When the building is dry and equipment is removed:
- Scan the QR code on each unit
- Log the removal —
EquipmentAction(action: remove) - Full lifecycle recorded: when installed, how many days running, when removed
13.5. Severity assessment & Dry Standard
Severity assessment — water category
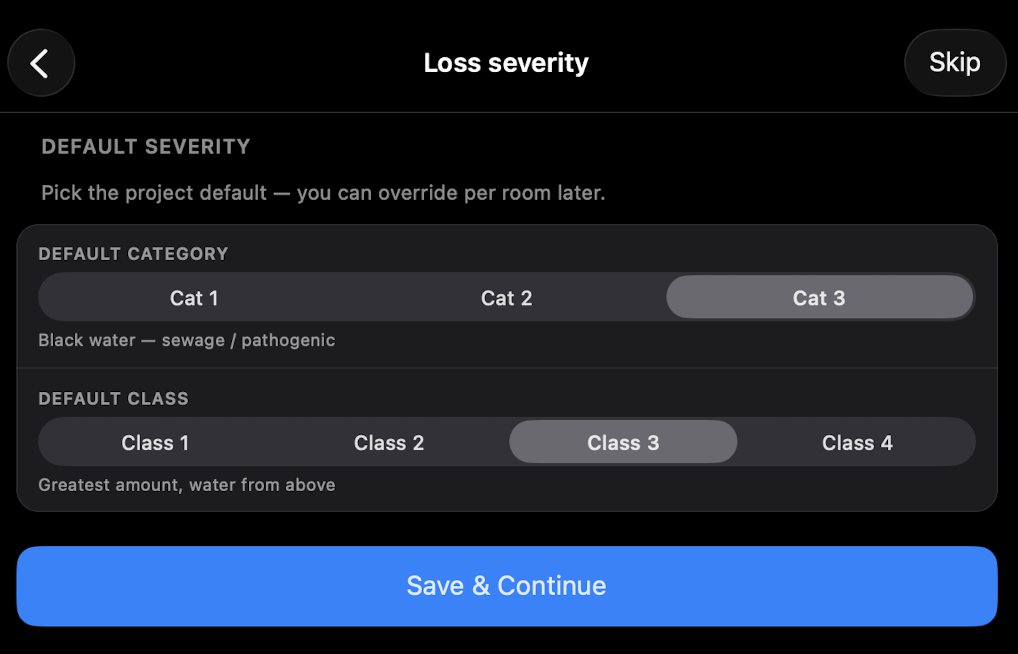
Each room is assigned a water damage category per IICRC S500:
- Category 1 (Clean Water) — sanitary water: pipe burst, dishwasher overflow, clean toilet supply. Normal PPE, no containment required.
- Category 2 (Gray Water) — significantly contaminated water: washing machine, toilet bowl overflow. Heightened PPE and containment per S500.
- Category 3 (Black Water) — highly contaminated: sewer backup, flooding. Strict containment, mandatory PPE, antimicrobial treatment.
Dry Standard — target moisture level
Dry Standard is the target moisture level for the affected materials, as defined by S500. It's determined by measuring an unaffected reference sample of the same material in the same space (e.g. an undamaged section of drywall in an adjacent room).
14. Materials
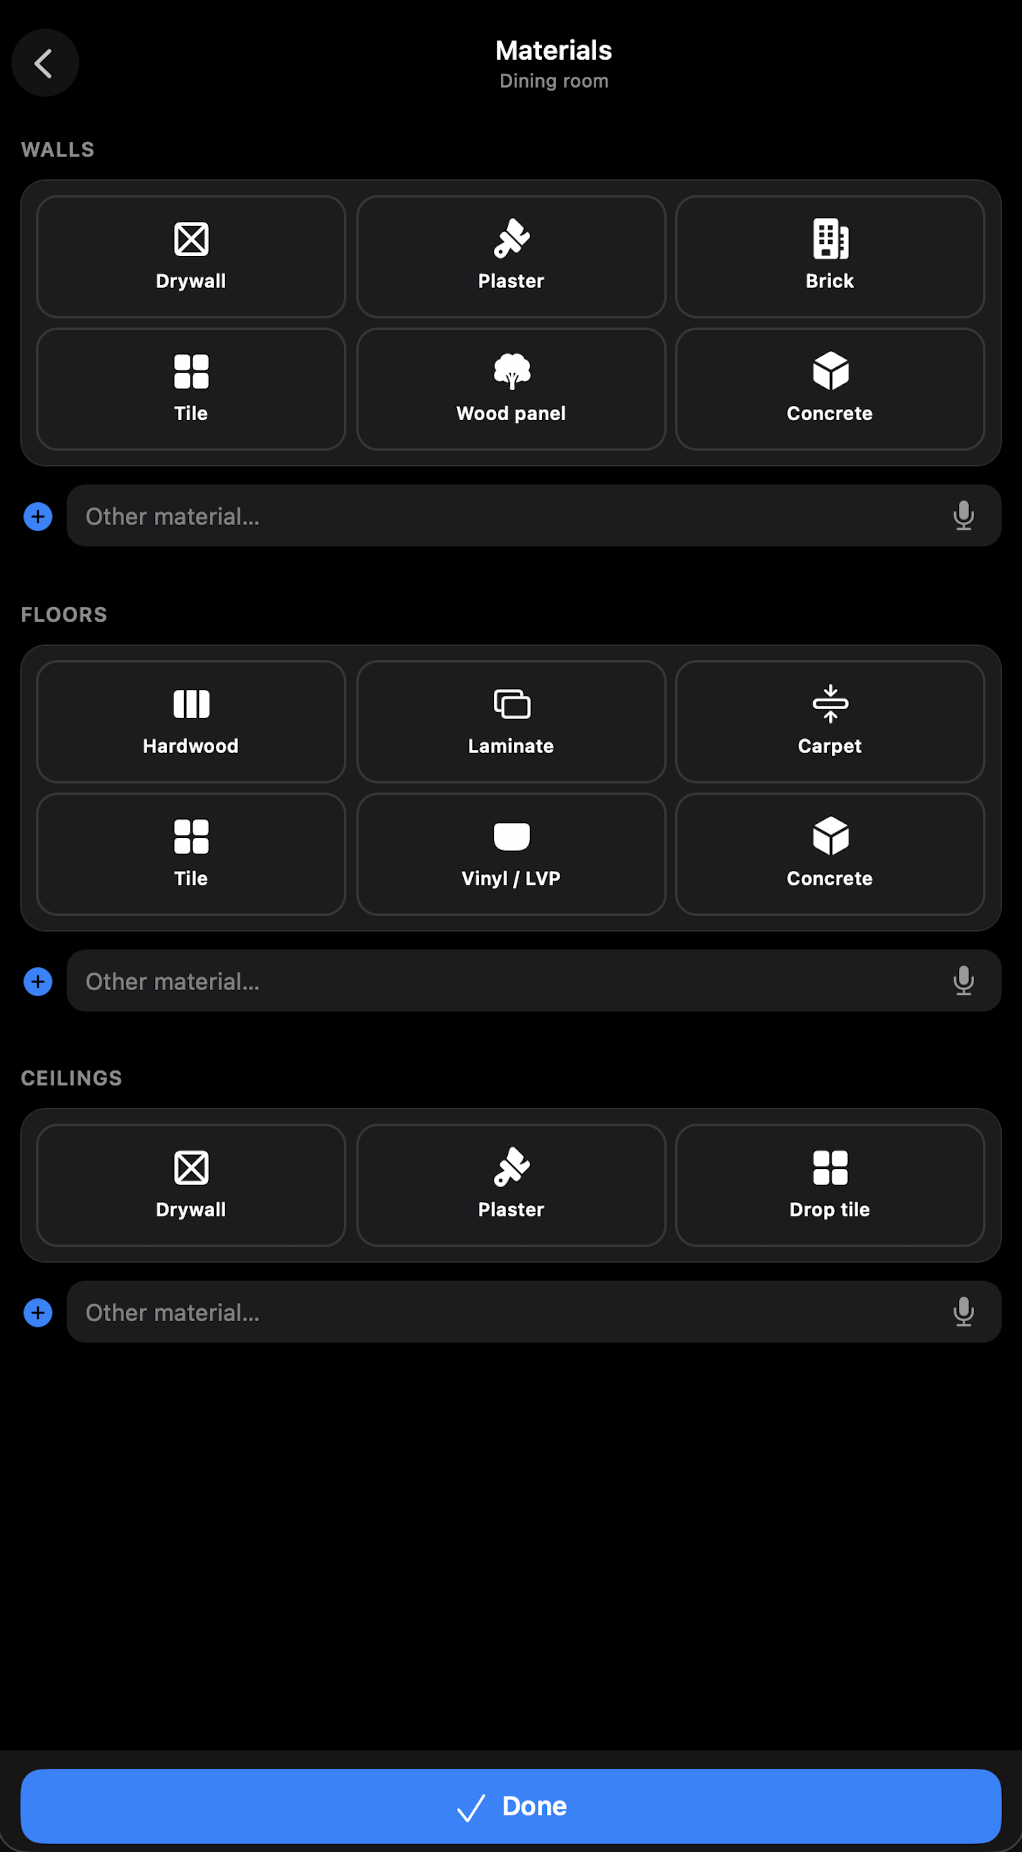
Screens: Material Log / Material Tagging
Logging of applied building and chemical materials.
What is recorded
- Material name (from catalog or entered manually)
- Area applied / quantity
- Room the application is linked to
- Date and inspector
Antimicrobial treatment
When applying antimicrobial (required for Category 2/3 per S500):
- Select the product from the catalog (with EPA Registration Number)
- Enter the treated area
- Date and inspector signature
- Automatically included in the S500 Compliance Packet
15. Scope of work
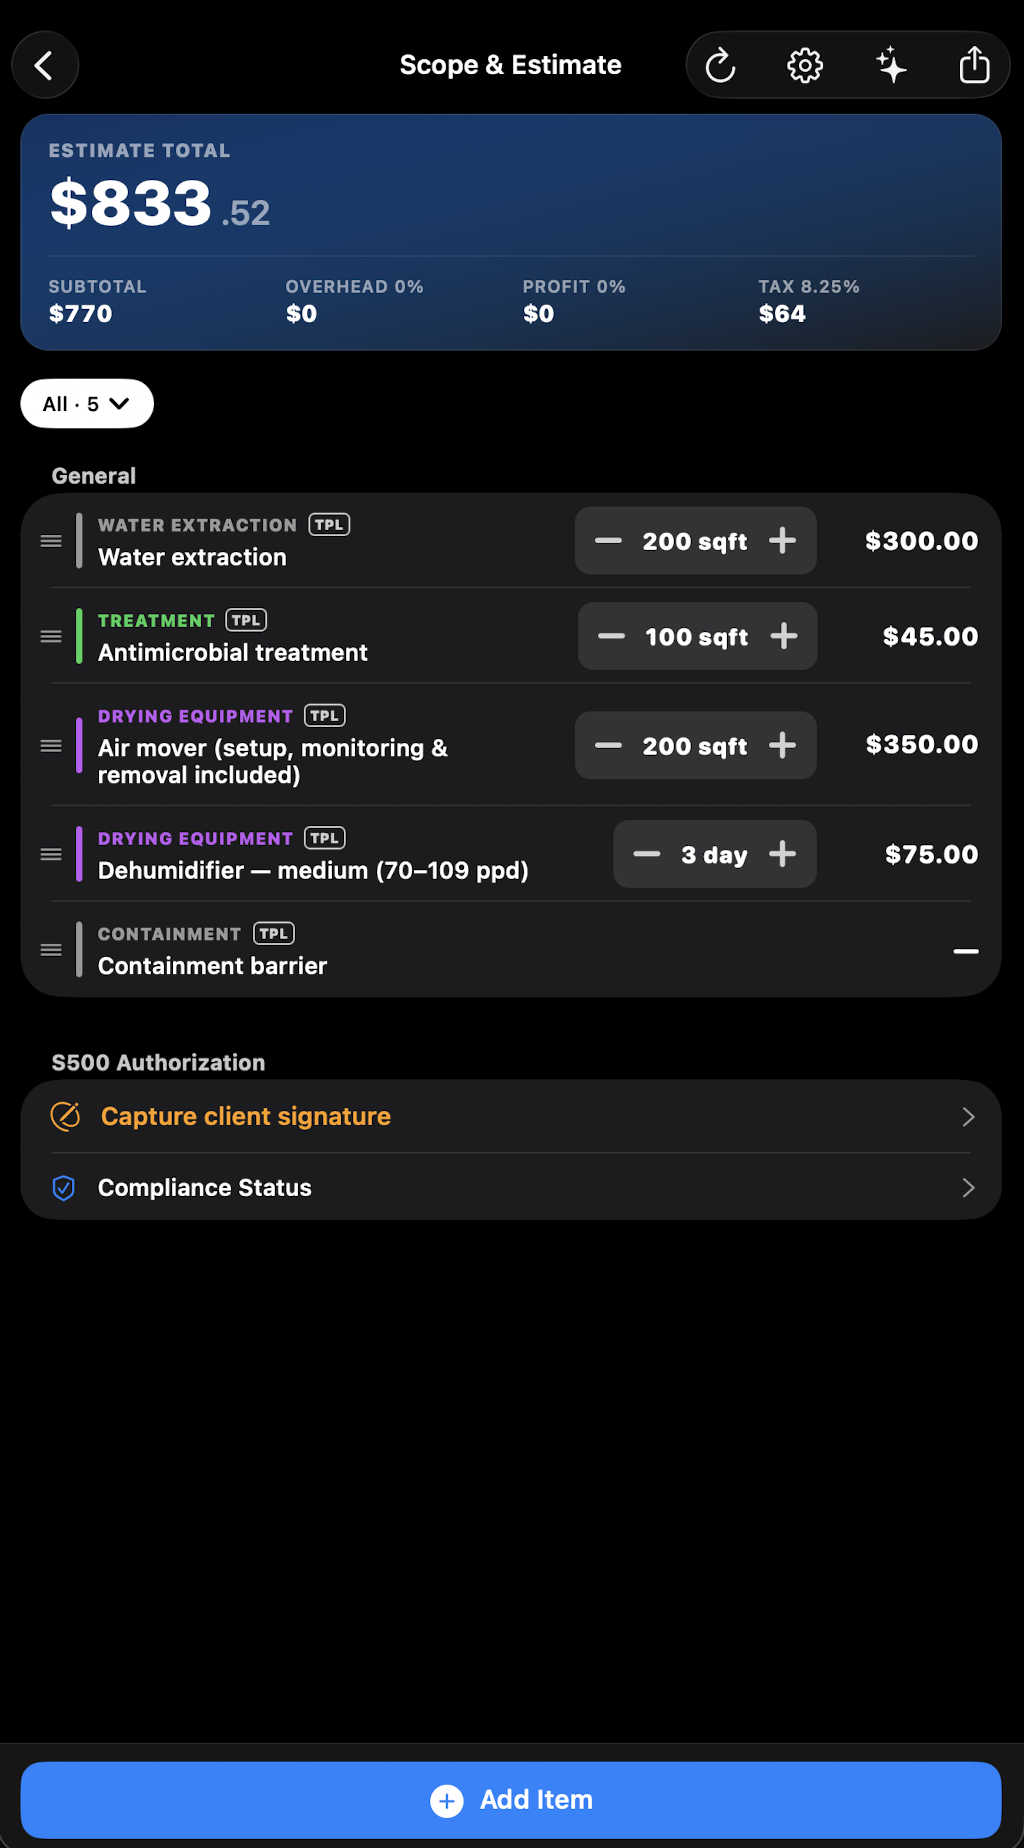
Screens: Scope of Work / Scope Video / Scope Catalog Picker / Scope Item Edit / Scope Estimate
The Scope of Work (SOW) is a structured list of work items that forms the basis for the insurance payment and client invoice. The app provides three ways to add items:
Method 1: Voice dictation (Scope Video)
The fastest method — record a video with spoken work descriptions right in the room.
- Open the Scope Video step for the room
- Tap record — video starts with live on-screen captions (on-device speech recognition)
- Dictate naturally: "Demo drywall on the north wall, about 120 square feet. Air mover needed. Antimicrobial on the studs."
- Stop recording
What happens automatically:
- Video uploads to server
- Whisper AI produces an accurate transcript
- GPT analyzes the transcript and extracts structured scope line items
- Each item gets an Xactimate-compatible code, quantity, and unit
- Inspector reviews and confirms each extracted item
Method 2: Scope catalog picker
- Tap Add Scope Item
- The catalog opens, grouped by category
- Search by name or keyword
- Select an item, enter quantity
- Saved immediately
Method 3: AI Review
AI Review analyzes inspection data — scope video transcripts, moisture readings, equipment parameters — and suggests specific SOW line items. This is analysis of collected data, not photo analysis. See Section 19 for details.
Estimate (Scope Estimate)
Screen: Scope Estimate / Estimate Settings
Based on added scope items the system builds an estimate:
- Prices from configuration (Xactimate-compatible codes)
- Subtotal per room and overall total
- Export to PDF — Estimate PDF Renderer
16. Drying monitoring
Screens: Monitoring Day Finalize / Drying Complete / Meter Readings List
After equipment install, the monitoring phase begins — daily visits to track drying progress.
Daily monitoring log
On each monitoring visit the system collects:
- Moisture readings per room and material
- Air temperature and relative humidity
- Dehumidifier readings (liters per day)
- Equipment check photos
After all readings are complete, tap Finalize Day — data is packaged and sent to the server.
Psychrometrics
The app calculates GPP (grains per pound) from T/RH readings — the S500 metric for drying deficit. All calculations happen on-device without internet.
When drying is complete
Screen: Drying Complete
When all readings have reached the target level (dry standard):
- The system prompts you to close the monitoring phase
- Inspector takes final After photos
- A final monitoring report is generated
Drying Clock
A visual drying timer — how many days since drying started, the S500 target, and a completion forecast based on reading trends.
17. Demo inspection — demolition
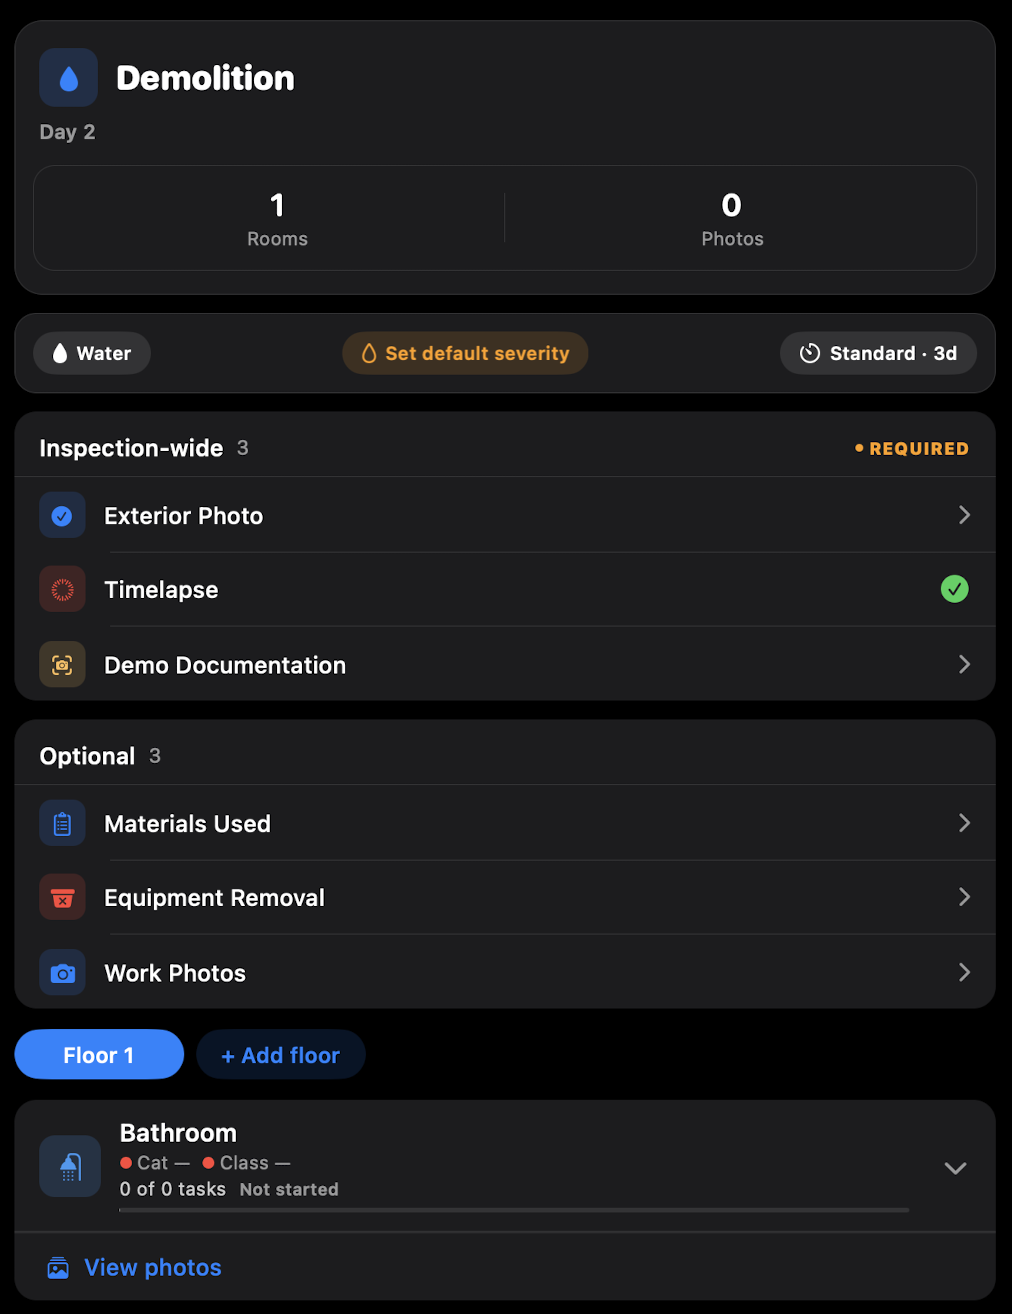
Screen: Demo Documentation
A specialized inspection type for documenting the demolition process.
How Demo Inspection works
- Exterior Photo — photograph the building exterior before work begins
- Timelapse — start interval capture: one frame every 2 minutes automatically throughout the workday (source: iPhone or Ricoh Theta)
- Demo Documentation — document each checkpoint: Containment Setup → Drywall Cutting → Drywall Removed → Insulation Exposed/Removed → Framing Exposed
- Materials Used (optional) — log crew consumables
- Equipment Removal (optional) — scan QR codes on removed units
- Work Photos (optional) — additional in-progress photos
Why document demolition step by step
- Evidence base for scope of work for the carrier — each step is documented
- Documents hidden damage discovered when opening up structures
- Protects the contractor in disputes — chronological record with photos and timestamps
Timelapse
Screens: Timelapse Session / Timelapse Source Picker
Timelapse is the second required Demo step (after Exterior Photo). Records interval frames to document multi-day progress.
- Open the Timelapse step in Demo Inspection
- Select source: built-in iPhone camera or external Ricoh Theta (over Wi-Fi)
- Set the capture interval — e.g. every 2 minutes
- Start the session — the app captures frames automatically on schedule
- When demo is complete, stop the session; frames upload to the server
Uses: complete demolition and drying documentation, visual progress confirmation for carrier and client, marketing material for your company.
18. Compliance — industry standard adherence
Screens: Compliance Status / Compliance Artifact Form
The app tracks compliance with the applicable industry standard based on loss type: S500 (Water), S520 (Mold), S700 (Fire), S760 (Wildfire), S540 (Biohazard). Compliance with the standard is the basis for carrier acceptance of the documentation package.
What the system tracks
| S500 requirement | What the app does |
|---|---|
| Water category (1/2/3) | Field in the room profile |
| Loss class (1/2/3/4) | Field in the room profile |
| Hours to category conversion | Automatic timer from loss date |
| Daily monitoring | Reading log per visit |
| Antimicrobial treatment | Materials log with EPA registration number |
| Psychrometrics | Auto-calculated GPP |
| Homeowner authorization signature | Digital signature + timestamp |
Compliance status
Screen: Compliance Status
The dashboard shows each requirement and its status:
- ✅ Complete
- ⚠️ Needs attention
- ❌ Missing
Category Conversion Warning
If more than 24–48 hours have elapsed since the loss, the system shows a warning: Category 1 water may have escalated to Category 2. This affects PPE and containment requirements.
Compliance Artifact Form
Form for filling in compliance documentation:
- PPE confirmation
- Containment setup (Category 2/3)
- Antimicrobial treatment
- Standard compliance checklist
Digital signature
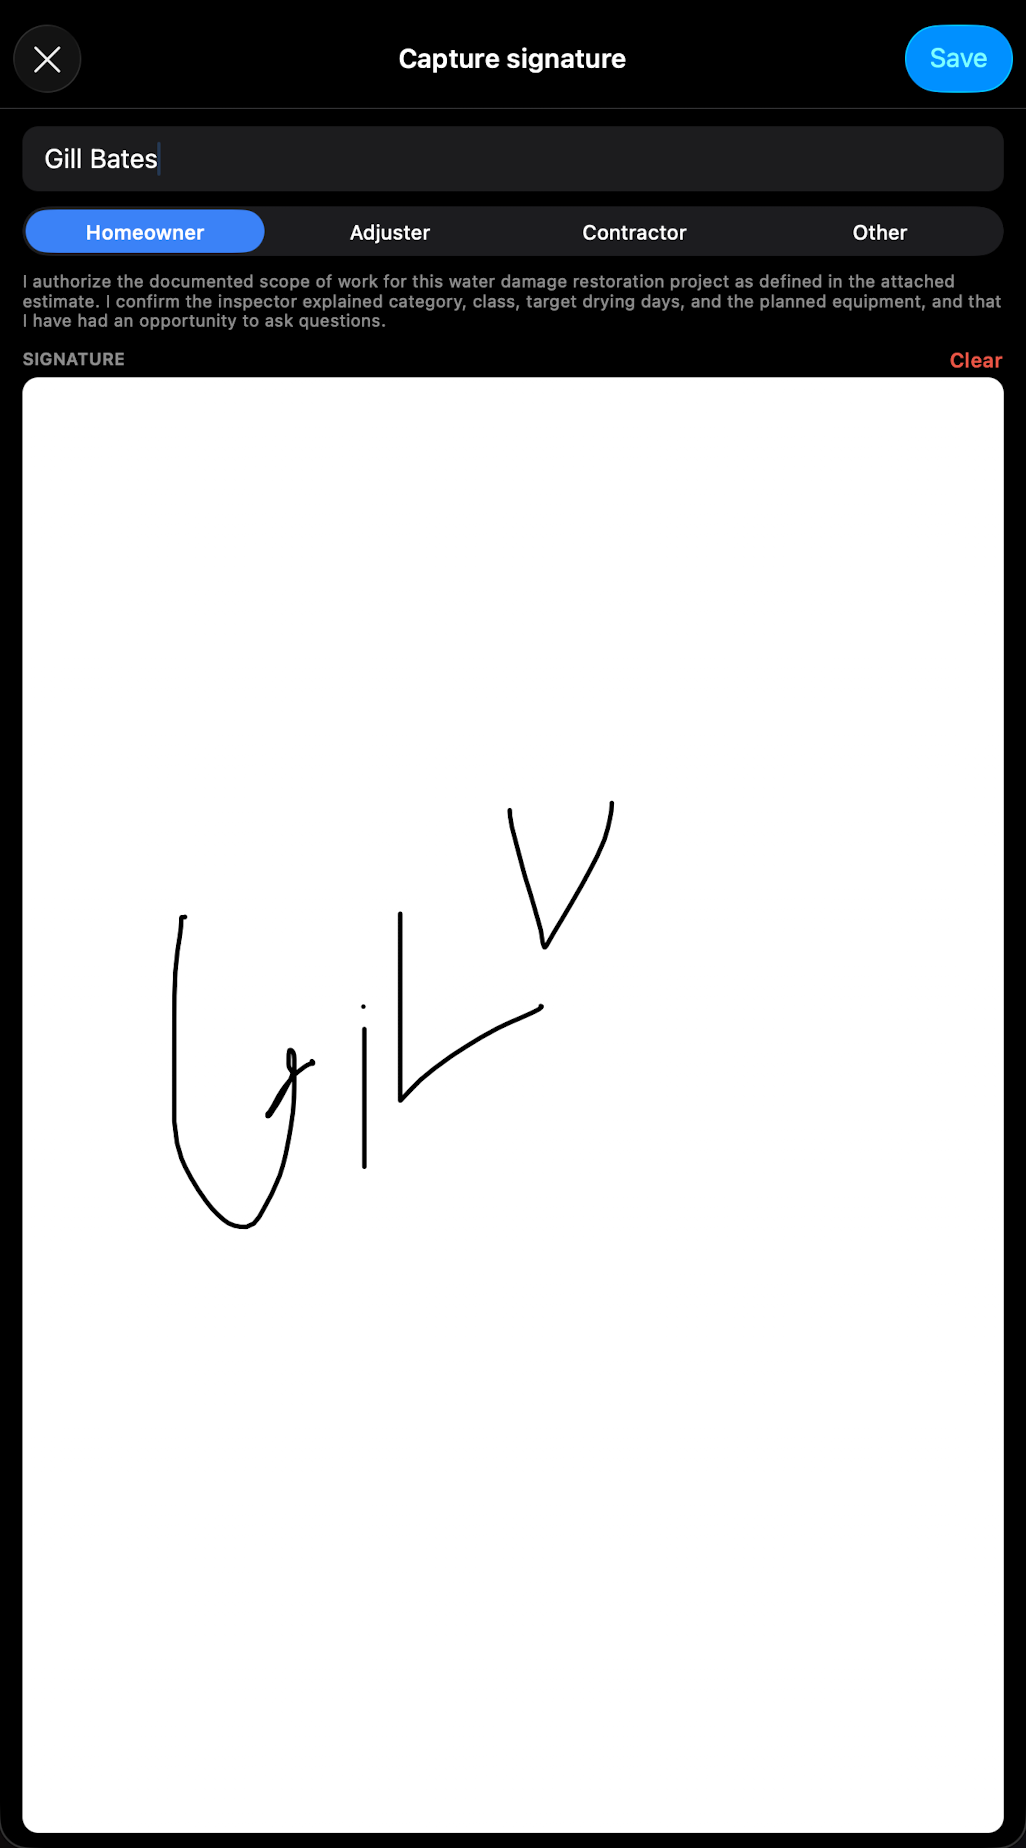
Screen: Signature Form Sheet
The property owner signs work authorization directly on the phone screen. The signature is saved with timestamp and geolocation.
19. AI notes & AI review
Screens: AI Notes / AI Review
AI Notes — smart notes
The inspector can dictate or type a note that AI processes and structures:
- Extracts key observations
- Suggests scope items
- Generates a brief summary for the office
AI Review — scope and compliance analysis
AI Review analyzes project data — scope items, inspection coverage, and compliance status — and returns a structured report:
- Gaps — missing required scope elements
- Additions — recommended items based on the loss profile
- Compliance flags — open compliance items that need attention
How to use AI Review
- Open Scope of Work → tap AI Review (button in the top-right)
- Wait for analysis (backend combines deterministic checks + LLM)
- Review the AI suggestions
- Accept or reject each suggestion individually
- Accepted items are added to Scope of Work
21. Sync & data upload
How sync works
The app syncs automatically — no manual action required.
- Any change (photo, reading, scope item) is saved locally immediately
- As soon as internet is available — data is sent to the server
- The office sees updates within seconds
Sync status icons
| Icon | Meaning |
|---|---|
| ✅ Green | All data synced |
| 🔄 Gray | Waiting for connection |
| ⬆️ Blue | Upload in progress |
| ⚠️ Yellow | Partial upload, items queued |
What is uploaded
- Photos and videos (one at a time, background upload)
- Project manifest (structured data: rooms, readings, scope, equipment)
- Scan files (3D models, panoramas)
Sync log
In the project card → Files you can review the history of all sync operations.
22. Offline mode
InspectCapture works fully without internet. This is critical for basements, remote areas, or poor signal conditions.
Available offline
- All projects loaded during the last connection
- Full capture: photos, video, scanning
- Readings and their storage
- Scope of Work (catalog cached at login)
- Equipment calculation and QR scanning
- Equipment calculation formulas
Requires internet
- AI video transcription — runs after upload
- AI photo review — runs after upload
- Office sync
- Configuration updates
Recommended practice
Open the project while you have Wi-Fi / LTE / 5G — for example, in the vehicle before you step out. After that, all project data is available offline.
23. Frequently asked questions
What if I accidentally closed the app during capture?
All data is saved locally continuously. An unfinished inspection is restored the next time you open the app.
Can two inspectors work the same project?
Yes. Each works in their own session. Data is merged on the server. In conflicts, the version with the newer timestamp wins. Recommended: coordinate — one inspector covers rooms A/B, the other covers C/D.
What if OCR didn't recognize the meter reading?
Enter the value manually. The display photo is still saved as documentation.
Can I delete an incorrect photo?
Photos can be removed from the local archive. If a photo has already been uploaded to the server, an admin action in the admin panel is required.
How long is data stored on the device?
Local data is kept until the project is marked complete and fully synced. After full sync, files may be offloaded from local storage to free space.
Is there a required step order?
Required workflow steps are indicated in the project card. Optional steps (3D scanning, panorama) can be done in any order.
What is "Dry Standard" and how do I set it?
Dry Standard is the target moisture level for a material, determined from an unaffected sample of the same material in the same space. Take the reading on the first day at a "control" point (e.g. drywall in an adjacent undamaged room). The system uses this as the target for the affected rooms' drying trend.